Living in a city doesn’t mean you have to give up on growing your own food or creating a green oasis. Urban permaculture brings the principles of sustainable, eco-friendly gardening into small spaces—balconies, rooftops, and even tiny apartments. By working with nature rather than against it, urban permaculture helps you grow fresh produce, reduce waste, and create a healthier living environment—all while minimizing your carbon footprint.
One of the easiest ways to dive into urban permaculture is by starting a vertical garden. Perfect for beginners, vertical gardens maximize limited space by growing plants upward instead of outward. Whether you have a sunny wall, a small balcony, or just a windowsill, a vertical garden lets you cultivate herbs, greens, and even some vegetables without needing a backyard. Plus, they’re low-maintenance, visually appealing, and can even improve indoor air quality.
In this guide, we’ll walk you through everything you need to know to get started with urban permaculture and vertical gardening. From choosing the right plants to building your own DIY vertical planter, we’ll cover all the basics so you can enjoy homegrown food—no matter how small your space is. Ready to turn your urban home into a thriving green sanctuary? Let’s dig in!
What is Urban Permaculture?
Definition and Principles of Permaculture
Permaculture is a sustainable design system that mimics natural ecosystems to create productive, low-waste environments. The term combines “permanent agriculture” and “permanent culture,” emphasizing long-term ecological balance. Developed by Bill Mollison and David Holmgren in the 1970s, permaculture is built on three core ethics:
- Earth Care – Protecting and regenerating natural resources.
- People Care – Supporting communities and self-reliance.
- Fair Share – Sharing surplus and limiting consumption.
These ethics are applied through 12 key principles, such as:
- Observe and interact – Work with nature, not against it.
- Catch and store energy – Use sunlight, rainwater, and compost efficiently.
- Use small, slow solutions – Start small and scale thoughtfully.
How It Applies to Urban Living
Urban permaculture adapts these principles to city environments, where space is limited but creativity thrives. Instead of sprawling farms, it focuses on:
- Vertical gardening (walls, trellises, stacked planters).
- Container gardening (pots, repurposed materials).
- Community gardens and shared green spaces.
- Closed-loop systems (composting, rainwater harvesting, renewable energy).
Even in apartments, you can practice permaculture by growing food on windowsills, keeping worm compost bins, or using balcony space for edible plants.
Sustainability and Self-Sufficiency Benefits
Urban permaculture isn’t just about growing food—it’s about reducing reliance on industrial systems while enhancing resilience. Key benefits include:
- Less food waste – Grow what you eat, compost scraps.
- Lower carbon footprint – Local food = fewer transport emissions.
- Biodiversity support – Attract pollinators with diverse plantings.
- Cost savings – Reduce grocery bills with homegrown herbs and veggies.
- Healthier living – Cleaner air, reduced stress, and nutrient-rich food.
By integrating permaculture into urban life, even small spaces can become thriving hubs of sustainability. Ready to put these ideas into action? Let’s explore the perfect starting point: vertical gardens.
Next section preview: Why vertical gardens are ideal for beginners and how they solve space challenges.
")
Why Choose Vertical Gardens?
Space-Saving Advantages for City Dwellers
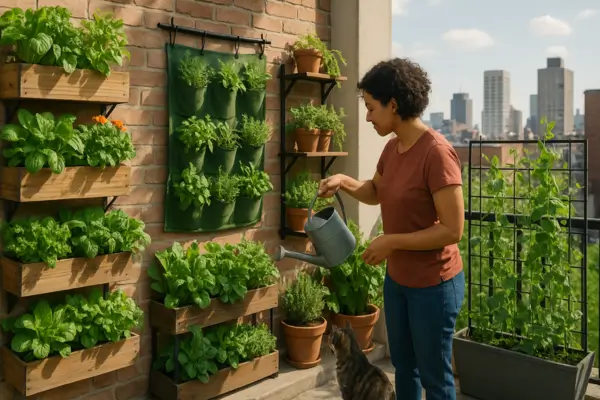
In crowded urban environments, every square foot counts. Traditional gardens require sprawling ground space—a luxury most apartment dwellers don’t have. Vertical gardens solve this problem by turning unused walls, railings, and balconies into lush, productive spaces. Whether you install hanging planters, stack modular containers, or repurpose a pallet into a living wall, you can grow herbs, greens, and even small vegetables without sacrificing precious floor space.
Vertical systems are also adaptable to any setting—indoors near a sunny window, on a fire escape, or along a fence. For renters, many setups are non-permanent, making them ideal for temporary homes.
Improved Air Quality and Aesthetic Appeal
Beyond saving space, vertical gardens actively enhance your living environment. Plants naturally filter airborne toxins (like formaldehyde and benzene) while releasing oxygen—a major perk for urban apartments with poor ventilation. Studies show that indoor plants can reduce stress, boost mood, and increase productivity, making them a wellness tool as much as a food source.
Aesthetically, green walls soften harsh urban landscapes, bringing nature’s calming effects into small spaces. Whether you prefer a sleek, modern herb panel or a wild, cascading flower display, vertical gardens add instant vibrancy to bland walls and balconies.
Accessibility for Beginners (Low Maintenance, Scalable)
Unlike large-scale gardening, vertical setups are forgiving and beginner-friendly:
- Low maintenance: Many vertical gardens use self-watering systems or drip irrigation, reducing daily care.
- Pest control: Elevated plants are less prone to ground-dwelling pests (like slugs).
- Easy to start small: Begin with a few herbs in pocket planters, then expand as you gain confidence.
- Modular designs: Add or rearrange planters as your needs change—no heavy digging or replanting.
For urbanites new to gardening, vertical systems offer a low-risk, high-reward entry point into permaculture. You’ll reap fresh flavors, cleaner air, and the satisfaction of growing food—no backyard required.
Next up: How to plan your vertical garden—selecting locations, plants, and systems.
Planning Your Vertical Garden
A well-planned vertical garden maximizes your space while ensuring healthy plant growth. Let’s break down the key considerations before you start planting.
A. Selecting the Right Location
Sunlight Requirements
Most edible plants need 4-6 hours of sunlight daily. Assess your space:
- South-facing walls/balconies get the most sun (ideal for tomatoes, peppers, herbs).
- East/West-facing spots offer moderate light (great for leafy greens, strawberries).
- North-facing or shaded areas suit low-light plants (mint, parsley, ferns).
Use a sunlight tracker app or observe patterns for a few days before planting.
Indoor vs. Outdoor Considerations
- Outdoor vertical gardens benefit from natural rain and pollinators but need weather-resistant materials.
- Indoor gardens require drainage trays and grow lights if natural light is limited.
Wall or Structure Suitability
- Weight capacity: Ensure walls can support wet soil and mature plants.
- Material: Use waterproof backings (like cedar or metal) to prevent moisture damage.
- Accessibility: Place gardens at eye level or waist height for easy maintenance.
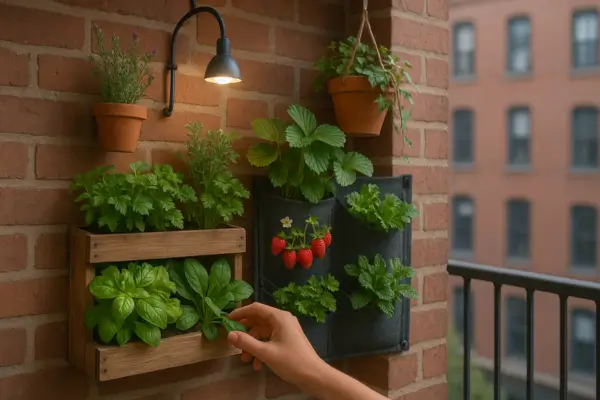
B. Choosing the Best Plants
Herbs, Leafy Greens, and Small Vegetables
Opt for shallow-rooted, compact plants that thrive vertically:
- Herbs: Basil, thyme, oregano, cilantro (fast-growing and aromatic).
- Leafy greens: Lettuce, spinach, kale (harvest continually).
- Vegetables: Cherry tomatoes, dwarf peppers, bush beans (use trellises).
- Trailing plants: Strawberries, nasturtiums (add visual appeal).
Avoid heavy or deep-rooted plants (like carrots or corn).
Companion Planting Tips
Boost yields and deter pests by pairing:
- Basil + tomatoes (improves flavor, repels flies).
- Marigolds + leafy greens (nematode control).
- Mint + cabbage (deters aphids—but keep mint contained!).
C. Picking a Vertical Garden System
DIY Options
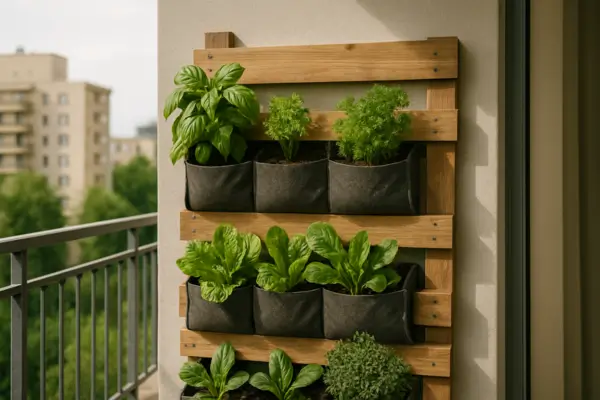
- Pallet gardens: Sand and line with landscape fabric; fill with soil.
- Hanging pots/gutters: Upcycle bottles or PVC pipes with drainage holes.
- Shoe organizers: Fabric pockets work for herbs and strawberries.
Tip: Use lightweight potting mix to reduce strain on structures.
Ready-Made Vertical Planters
- Tiered shelves: Stacked planters (like the “GreenStalk”) save space.
- Pocket gardens: Felt or fabric wall planters (e.g., “Woolly Pockets”).
- Modular panels: Interlocking systems (like “VertiGarden”) for flexibility.
Budget-friendly? Start with a small hanging system and expand later.
Next step: Building your vertical garden—materials and assembly instructions.
")
Building Your Vertical Garden – Step by Step
Ready to turn your vertical garden vision into reality? Follow this simple guide to create a thriving, space-saving green wall—perfect for beginners!
Materials Needed
Here’s what you’ll need for a basic pallet vertical garden (one of the easiest DIY options):
✔ Wooden pallet (heat-treated, not chemically treated)
✔ Landscape fabric or burlap (to line the pallet)
✔ Staple gun or heavy-duty staples
✔ Potting soil (lightweight mix with perlite/vermiculite)
✔ Plants (herbs, succulents, or small flowers)
✔ Scissors/utility knife
✔ Gardening gloves
Alternative options: Use hanging shoe organizers, PVC pipes, or wall-mounted planters if you prefer a different setup.
Assembly Instructions for a Simple DIY Vertical Garden
Step 1: Prepare the Pallet
- Clean the pallet: Remove dirt or debris.
- Sand rough edges (optional, for safety).
- Line the inside: Cut landscape fabric to fit the back, sides, and bottom of the pallet, then staple securely. This keeps soil in place while allowing drainage.
Step 2: Fill with Soil
- Lay the pallet flat on the ground.
- Fill the gaps between slats with potting mix, packing it firmly.
- Leave the top open for easy planting.
Step 3: Plant Your Greenery
- Remove plants from pots, gently loosening roots.
- Tuck plants into soil-filled gaps, spacing them 4–6 inches apart.
- Add trailing plants at the top (like ivy or strawberries) for a cascading effect.
Step 4: Secure and Position
- Let the pallet rest flat for 1–2 weeks so roots establish.
- Gradually tilt upright (against a wall or fence).
- Secure with brackets if needed (for stability).
Soil and Irrigation Tips for Healthy Growth
Best Soil for Vertical Gardens
- Use lightweight, well-draining potting mix (avoid garden soil—it’s too heavy).
- Mix in compost or worm castings for nutrients.
- For succulents, add extra perlite or sand for drainage.
Watering Your Vertical Garden
- Drip irrigation: Install a simple drip system with a timer for consistent moisture.
- Self-watering planters: Use reservoirs to reduce frequent watering.
- Hand-watering tip: Water slowly from the top, letting it trickle down (check for dry spots).
Pro Tip: Stick your finger 1–2 inches into the soil—if dry, it’s time to water!
Next Up: Maintaining your vertical garden—watering schedules, pest control, and seasonal care.
Maintaining Your Vertical Garden
Now that your vertical garden is thriving, keeping it healthy is simple with the right care routine. Here’s how to master watering, pest control, and seasonal adjustments for a lush, productive green wall.
Watering Techniques for Vertical Gardens
Drip Irrigation Systems
- Best for: Large or hard-to-reach vertical gardens
- How to set up:
- Use a timer-connected drip kit (available at garden centers)
- Run tubing along the top of your garden with emitters near each plant
- Water in the early morning to reduce evaporation
- Benefits: Consistent moisture, water conservation
Self-Watering Planters
- Best for: Busy urban gardeners
- How they work:
- Reservoirs at the base wick water up to roots
- Refill only when the water gauge is low
- Top picks:
- Woolly Pocket planters
- GreenStalk Vertical Planter
Hand-Watering Tips
- Frequency: 2-3 times weekly (more in heat waves)
- Method:
- Water slowly from the top, letting it trickle down
- Check soil moisture with your finger (dry 1″ down = needs water)
- Use a watering wand for precise application
Pro Tip: Group plants with similar water needs together to simplify care.
Organic Pest Control Methods
Prevention First
- Companion planting: Mix in pest-repelling plants like:
- Marigolds (deter nematodes)
- Basil (repels flies and mosquitoes)
- Chives (discourage aphids)
Natural Remedies
- Neem oil spray (for aphids/mites):
- Mix 1 tsp neem oil + 1/2 tsp dish soap in 1 quart water
- Spray leaves weekly
- Garlic-chili spray (for chewing insects):
- Blend 2 garlic cloves + 1 chili pepper in 2 cups water
- Strain and spray affected plants
- Manual removal:
- Pick off larger pests (like caterpillars) by hand
- Use a strong water spray to dislodge aphids
Note: Avoid chemical pesticides—they harm beneficial pollinators!
Seasonal Care and Plant Rotation
Spring/Summer
- Fertilize monthly with liquid seaweed or compost tea
- Prune aggressively to encourage bushy growth
- Add shade cloth if plants scorch in peak heat
Fall/Winter
- Harvest remaining crops before frost
- Protect cold-sensitive plants:
- Move containers indoors near sunny windows
- Cover outdoor systems with frost cloth
- Plant cold-hardy greens: Kale, spinach, and parsley thrive in cool weather
Year-Round Tips
- Rotate crops every season to prevent soil depletion
- Refresh soil annually by removing top 2-3 inches and adding compost
- Disinfect tools between seasons to prevent disease spread
Next Up: Troubleshooting common vertical garden problems—from yellow leaves to poor drainage.
“The glory of gardening: hands in the dirt, head in the sun, heart with nature.”
– Alfred Austin
")
Troubleshooting Common Vertical Garden Issues
Even the most carefully planned vertical gardens can run into problems. Don’t worry – most issues have simple solutions! Here’s how to diagnose and fix the most common challenges.
Overwatering or Poor Drainage Solutions
Warning Signs:
- Yellowing leaves
- Mushy stems
- Fungus gnats flying around plants
- Musty soil smell
Quick Fixes:
- Improve Drainage
- Add perlite or coarse sand to soil (up to 30% mix)
- Ensure containers have drainage holes (drill more if needed)
- Place breathable landscape fabric between soil and planter
- Adjust Watering Habits
- Let soil dry slightly between waterings
- Water in morning (not evening) to prevent overnight sogginess
- Use the “finger test” – only water when top inch feels dry
- Emergency Rescue
- Remove affected plants immediately
- Trim rotten roots and repot in fresh, dry soil
- Sprinkle cinnamon on soil (natural antifungal)
Dealing With Limited Sunlight
Low-Light Solutions:
Plant Choices:
- Opt for shade-tolerant varieties:
- Leafy greens (spinach, kale, lettuce)
- Herbs (mint, parsley, chives)
- Ferns or pothos (ornamental options)
Light-Boosting Tricks:
- Reflective surfaces: Place mirrors or white boards behind plants
- Rotate plants weekly for even light exposure
- Grow lights: Use affordable LED strips (6-12 hours daily)
When to Give Up:
- If plants become leggy or fail to produce after 6 weeks
- Consider relocating garden or switching to artificial light
Reviving Struggling Plants
Diagnosis Guide:
| Symptom | Likely Cause | Solution |
| Drooping leaves | Underwatering | Soak pot in water 15 mins |
| Brown crispy edges | Low humidity | Mist leaves daily |
| Pale leaves | Nutrient deficiency | Apply liquid fertilizer |
| Stunted growth | Root-bound | Move to larger container |
| Holes in leaves | Pests | Apply neem oil treatment |
General Revival Protocol:
- Isolate the plant to prevent spreading issues
- Trim dead material with clean scissors
- Check roots – healthy ones are white and firm
- Refresh environment (better light/water/soil as needed)
- Be patient – recovery takes 2-4 weeks
Pro Tip: Keep a gardening journal to track what works for your space!
Coming Next: Expanding your urban permaculture journey – composting, rainwater harvesting, and community projects.
“Plants don’t fail – they simply communicate their needs in ways we’re learning to understand.”
 (1)")
Expanding Your Urban Permaculture Journey
Congratulations on mastering vertical gardening! Now, let’s explore how to deepen your sustainability practice and create an even greater impact in your urban environment.
Incorporating Composting and Rainwater Harvesting
Small-Space Composting Solutions
Even in tight quarters, you can recycle organic waste into nutrient-rich soil:
✔ Bokashi Bins
- Ferments all food scraps (including meat/dairy) in an airtight container
- No odor, perfect for apartments
- Produces “compost tea” for fertilizing plants
✔ Worm Farms (Vermicomposting)
- Red wriggler worms process scraps 2x faster than traditional compost
- Compact stacking systems fit under sinks or on balconies
- Harvest castings monthly for supercharged plant food
✔ Community Compost Hubs
- Many cities now offer drop-off programs
- Some urban farms trade compost for fresh produce
Rainwater Harvesting for Vertical Gardens
Reduce water bills and reliance on treated water:
- Balcony Barrel System
- Install a 50-gallon rain barrel with spigot
- Use window runoff by redirecting downspouts
- Add mosquito dunks to prevent breeding
- Indoor Greywater Recycling
- Collect pasta water or dehumidifier output
- Use for irrigation within 24 hours (no food particles)
Pro Tip: Combine these systems by using compost tea to enrich rainwater for irrigation!
Scaling Up With Advanced Permaculture Techniques
Microclimate Engineering
Multiply your growing potential by creating specialized zones:
- Heat Sinks: Paint walls dark colors to radiate warmth for heat-loving plants
- Windbreaks: Install trellises with climbing beans to protect delicate greens
- Fog Harvesting: Hang mesh screens to condense morning dew for irrigation
Perennial Polycultures
Move beyond single crops with self-sustaining plant communities:
- Guild Planting Example (1 sq ft):
- Central: Dwarf fruit tree (fig or citrus in pots)
- Understory: Alpine strawberries (ground cover)
- Supporters: Borage (pollinator magnet) + Chives (pest deterrent)
Integrated Aquaponics
Combine fish farming with vertical gardening:
- Desktop System:
- 10-gallon aquarium grows herbs via water pump
- Betta fish or goldfish provide nutrients
- Requires minimal space and maintenance
Community and Shared Urban Gardening Initiatives
Start a Building-Wide Garden
- Rooftop takeover: Petition for unused space (many cities offer grants)
- Stairwell gardens: Utilize sunny window wells for communal herbs
- Tool libraries: Share equipment with neighbors via QR code checkout
Join or Launch a Seed Swap
- Host seasonal events at local cafes or libraries
- Create a “seed bomb” station for guerrilla gardening
- Develop a neighborhood plant rescue program
Participate in Citizen Science
Contribute to urban agriculture research:
- Pollinator counts with iNaturalist app
- Soil testing through university extension programs
- Microclimate mapping projects
“Alone we can grow plants, but together we can grow ecosystems.”
Your Next Steps:
- Pick one advanced technique to implement this month
- Connect with two local gardeners (try Nextdoor or Meetup)
- Measure your impact (lbs of compost created, gallons of rainwater saved)
What urban permaculture project excites you most? Share your plans below!
Coming Soon: Our free Urban Permaculture Blueprint – subscribe for exclusive access!
Grow Up, Not Out – Your Urban Oasis Awaits
You now hold all the tools to transform blank walls and cramped balconies into thriving vertical ecosystems. Let’s revisit why this journey matters:
🌿 Simplicity Wins: From repurposed pallets to smart irrigation, we’ve shown how anyone – regardless of space or experience – can cultivate fresh food and beauty overhead.
🌎 Impact Multiplied: Every vertical garden cleans air, cools cities, and reduces food miles. Yours joins a global movement redefining what urban sustainability looks like.
Your Invitation to Act
The perfect time to start? Today. Here’s how:
- Begin Small but Start Now
- Grab one container (an old shoe organizer or coffee tin works)
- Plant a single basil or lettuce seedling
- Watch how that first harvest fuels your confidence
- Share the Growth
- Snap a photo of your setup (#UrbanPermacultureMadeEasy)
- Gift starter plants to neighbors – build community roots
- Keep Learning Together
- Drop a comment below:
“What’s your #1 vertical garden win or challenge?”
- Join our Urban Growers Circle for exclusive tips
The Ripple Starts With You
That first herb you snip from your vertical garden does more than flavor meals – it proves change is possible, one leaf at a time. Your city needs this green revolution, and we can’t wait to see what you grow.
“The greatest gift of the garden is the rediscovery of our capacity to nurture.”
What will you plant first? Tell us below – your idea might inspire someone else’s breakthrough! 🌱