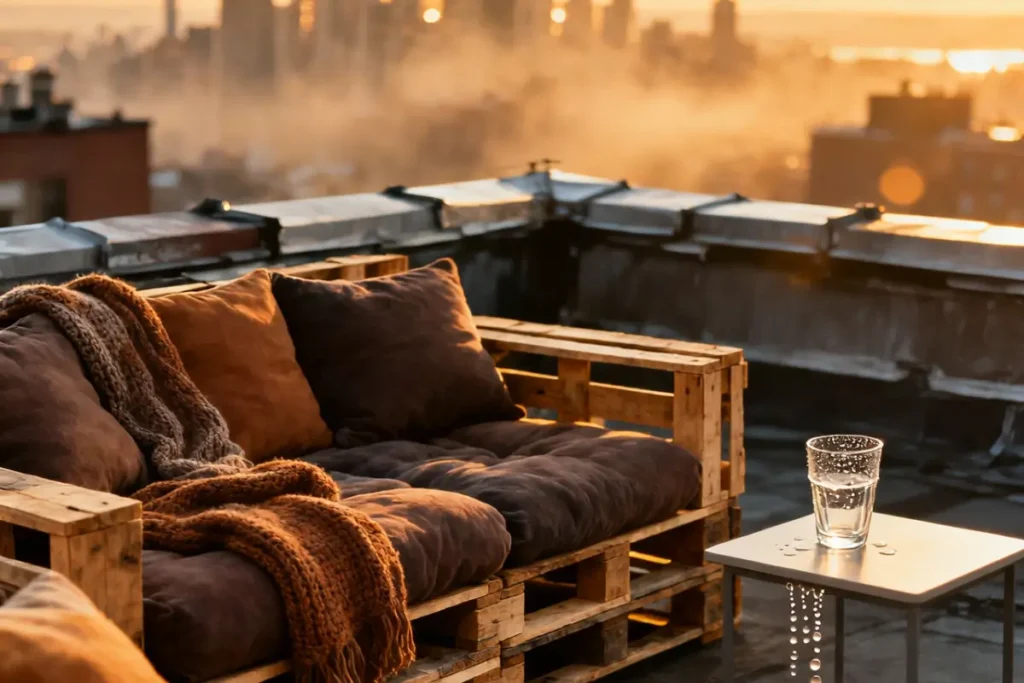
Your Rooftop Retreat Awaits
Picture this: a golden-hour glow paints the skyline as you unwind in your own private perch above the city. The air is cool, your drink is cold, and you’re nestled into a deep, comfortable sofa that’s perfect for conversation or quiet contemplation. This isn’t a luxury penthouse advertisement—it’s the potential of your underused rooftop, balcony, or patio. The only thing missing? The outrageously expensive outdoor furniture set to make it complete.
Enter the most unlikely of heroes: the humble wooden pallet. Often discarded behind warehouses, this everyday workhorse holds the secret to creating the ultimate DIY centerpiece. With some vision and simple effort, these rough planks can be transformed into a stunning, sturdy, and deeply personalized sofa that doesn’t just fit your space, but also your budget.
This guide is your blueprint to building that dream spot. We’re going to create the ultimate pallet sofa that ticks every box: cheap (think more “creative budget” than “costly loan”), surprisingly comfy (no, really!), and perfectly suited for turning your concrete slab or wooden deck into a genuine urban oasis. And the best part? You’ll be giving discarded materials a stylish second life, making your new favorite spot a testament to smart, sustainable style. Let’s build something amazing.
Why a Pallet Sofa Belongs on Your Rooftop
So, why choose a pallet sofa over a store-bought set for your elevated escape? The reasons go far beyond just saving money, making it the undisputed champion for rooftop living.
The Budget Superhero: Let’s talk numbers. A quality commercial outdoor sofa set can easily climb into the thousands. A pallet sofa, on the other hand, is a triumph of frugality. Your primary material—the pallets—can often be sourced for free or a few dollars each. Even after adding supplies like sandpaper, screws, stain, and cushions, your total cost will likely be a fraction of retail. You’re investing your time and creativity, not your entire savings account.
Customizable to Perfection: Your rooftop isn’t a standard shape, and your pallet sofa doesn’t have to be either. This is its superpower. Need a long, low lounger to stretch out on? Stack two pallets. Dreaming of a wrap-around sectional for entertaining? Build an L-shape. Working with a narrow balcony? A single-pallet bench is your answer. You control the dimensions, the height, and the configuration, crafting a piece that fits your space like a glove, not a compromise.
Built for the Elements (With the Right Prep): Wood is a classic outdoor material for a reason. While pallets start rough, they are inherently sturdy. The key is proper preparation. Once sanded smooth, sealed with a weather-resistant stain or exterior paint, and protected from prolonged direct moisture, your pallet sofa will stand strong against sun, breeze, and the occasional unexpected drizzle, season after season.
The Ultimate Upcycle: There’s a unique satisfaction that comes from building with reclaimed materials. You’re not just making furniture; you’re telling a story. You’re rescuing functional wood from a landfill and giving it a beautiful, purposeful second act. This sustainable choice adds a layer of character and soul to your oasis that brand-new furniture simply can’t replicate.
Lightweight & Modular: Unlike heavy, solid-wood outdoor sets, a pallet sofa is relatively lightweight and inherently modular. This is a huge advantage for rooftops, balconies, and renters. You can easily rearrange the pieces to suit different occasions—push them together for a party, pull them apart for intimate conversations, or even move them to follow the sun or shade. This flexibility ensures your oasis can evolve with your needs.

Pre-Build Checklist: Gearing Up
Before you dive into the fun of construction, a little preparation is the key to a smooth, successful, and safe build. Think of this as your mission briefing—gathering all the intel and gear you need to ensure your pallet sofa project is a triumph, not a trip back to the hardware store.
1. Sourcing Your Pallets: The Treasure Hunt Your foundational material is often free for the finding. Start your search at:
- Local Businesses: Small warehouses, furniture stores, garden centers, large hardware stores, and industrial parks often have pallets they pay to dispose of and are happy to give away.
- Online Marketplaces: Check Craigslist, Facebook Marketplace, or Freecycle groups. Search for “free pallets” or “wood pallets.”
- Always Ask First: Never take pallets from a stacked pile without permission.
The Non-Negotiable Safety Tip: Only use pallets stamped with “HT” (Heat-Treated). This means they were sterilized with heat, not harmful methyl bromide chemicals (which would be stamped “MB”). The HT stamp is your guarantee of a safe, non-toxic material for your furniture. Avoid pallets that are stained (especially with mysterious dark spills), smell strongly of chemicals, or are visibly damaged or rotted.
2. Essential Tools: The DIY Arsenal You likely have most of these already. The basics are:
- Safety Gear: Gloves, safety glasses, and a dust mask/respirator (sanding creates a lot of dust).
- Preparation: A power sander (or a lot of elbow grease and sandpaper in various grits—start coarse, finish fine). A pry bar can be useful for removing damaged planks.
- Construction: A drill/driver with screwdriver bits, a saw (a circular saw or jigsaw is helpful for cutting pallets to size, though some designs need none), a measuring tape, a carpenter’s square, and a level.
- Finishing: Paintbrushes or foam rollers for applying stain or sealant.
3. The Material Shopping List With pallets and tools secured, here’s your shopping list for everything else:
- Pallets: The number depends on your design. A simple two-pallet-long sofa base needs 2. A sofa with a backrest might need 3-4. An L-shaped sectional could require 5-6. Sketch your plan first!
- The Comfort (Cushions & Padding): This is your biggest comfort and style variable.
- Buying: Look for outdoor-rated cushions filled with quick-dry foam and covered in solution-dyed acrylic fabric (like Sunbrella®). They resist mildew and fading. Measure your finished seat area for accurate sizing.
- DIY: For a budget option, use high-density foam cut to size (available at fabric/craft stores) and sew covers from outdoor fabric. A simpler hack? Arrange standard bed pillows inside weatherproof pillowcases or covers.
- Fasteners: Use exterior-grade or deck screws (3-inch length is versatile). They won’t rust. Have some L-brackets or corner braces on hand to reinforce joints for maximum sturdiness.
- Finishes – Your Weather Shield: This is critical for longevity outdoors.
- For a Natural Look: Use an exterior wood stain or sealant with UV protection. It soaks into the wood, highlighting the grain while guarding against sun and water.
- For Color: Use exterior/patio paint. Ensure the wood is clean, dry, and lightly sanded first.
- Optional Upgrades:
- Casters: Locking wheels make moving your modular sofa a breeze.
- Backrest Materials: For an attached back, use a sheet of sanded plywood cut to size, or simply secure a third pallet vertically (at a slight angle for comfort).
- Cleats/Strapping: To secure loose cushions on windy rooftops.
Gather this list, and you’ll be more than ready to transform that stack of rough wood into the centerpiece of your rooftop oasis. Let’s build.
The Build: Crafting Your Comfy Throne (Step-by-Step)
This is where the vision becomes reality. Follow these steps methodically to transform a stack of pallets into a sturdy, weather-ready foundation for your rooftop relaxation.
Step 1: Design & Planning – Blueprint Your Oasis Don’t skip the plan! A little forethought prevents frustration later.
- Measure Twice: Get the exact dimensions of your rooftop space. Account for walkways, planters, and other furniture. Leave at least 18-24 inches of clearance for comfortable movement around the sofa.
- Simple Sketches: Grab a notepad. A classic 2-pallet-long sofa is a perfect start. Want a 3-pallet chaise for stretching out? Dreaming of an L-shaped sectional for conversation? Draw it. Decide if you want it low (one pallet high) or standard seat height (two stacked pallets). This sketch is your roadmap.
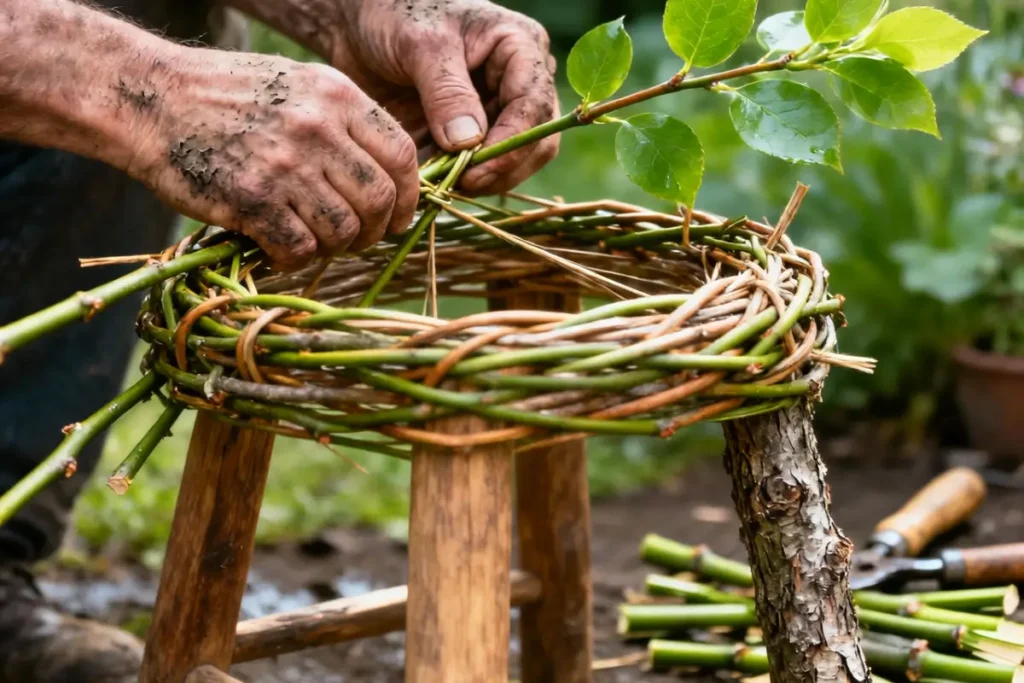
Step 2: Pallet Prep is Key – Safety & Smoothness First This is the most labor-intensive but crucial step for quality and comfort.
- Inspect & Disassemble (If Needed): Check each pallet for broken boards, protruding nails, or excessive warping. Use your pry bar to carefully remove any damaged planks, and a hammer to pull or punch down any stubborn, protruding nails.
- The Crucial Sanding Mission: Arm yourself with your sander (start with 80-grit, finish with 120-grit) or sanding blocks. Sand every single surface you might touch—tops, sides, edges—until they are completely smooth to the touch. This eliminates splinters and creates a perfect surface for staining or painting. Don’t forget the ends of the boards!
Step 3: Assembly (The Framework) – Building Rock-Solid Structure Time to create the bones of your sofa.
- Building the Base: Place your first pallet(s) on a flat surface. If stacking for height, align the second pallet perfectly on top. From underneath or through the sides, use your drill and 3-inch deck screws to securely fasten the pallets together at every point of contact. Use at least 4-6 screws per connection point. Pro-Tip: Pre-drill holes slightly smaller than your screw diameter to prevent the wood from splitting.
- Creating a Backrest: For a simple straight backrest, secure a third pallet vertically to the back of the base using L-brackets on the inside corners. For a more comfortable angled backrest, position the pallet at a 100-110 degree angle (slightly reclined) before bracketing it securely.
- Adding Stability: This is what separates wobbly from wonderful. Reinforce all major joints—especially where the backrest meets the base and where pallets are stacked—with heavy-duty steel L-brackets or corner braces. This ensures your sofa can handle enthusiastic lounging.
Step 4: Weatherproofing for Longevity – The Essential Shield This step is non-negotiable for a rooftop sofa! It protects your hard work from sun, rain, and time.
- Ensure your assembled frame is clean and dust-free from sanding.
- In a well-ventilated area, apply a generous coat of outdoor wood stain, sealant, or exterior paint. Use a brush to get into all the grooves and cracks.
- Follow the product directions for drying time, and apply a second coat for complete coverage. Pay special attention to the end grain of the wood, which soaks up moisture the most. Allow the finish to cure fully (usually 24-48 hours) before adding cushions.
Step 5: The Comfort Factor: Cushions & Textiles – The Cozy Finale Now for the magic that makes it a true sofa.
- Choosing Outdoor-Rated Cushions: For a worry-free, long-lasting solution, invest in cushions specifically made for outdoors. Look for quick-dry foam fill and fabric like Sunbrella that resists fading, stains, and mildew. They are worth the investment for a carefree oasis.
- DIY Cushion Hack: On a tight budget? Use high-density foam cut to size (wrap it in a plastic bag first as a moisture barrier) or even repurpose bed pillows. Then, sew simple envelope-style covers from affordable outdoor fabric. It’s a custom, cost-effective solution.
- The Finishing Touch – Textiles: Add personality and layers of comfort with weather-resistant throw pillows and a cozy outdoor blanket (stored indoors when not in use). This is where you inject color, pattern, and that irresistible inviting feel.
Stand back and admire your work. Your sturdy, custom, comfy throne is now ready for its royal debut on the rooftop.

Styling Your Rooftop Oasis
Your pallet sofa is the anchor—the heart of your outdoor room. Now, it’s time to build the atmosphere around it. Thoughtful styling transforms a functional seating area into a true personal sanctuary. Here’s how to cultivate the vibe.
Layout Ideas: Define Your Zones Consider how you want to use the space, then arrange your modular sofa to match.
- The Conversation Pit: Arrange your pallet sofas (or sections) in a U-shape or facing each other with a central coffee table. This fosters connection and is perfect for evenings with friends.
- The Lounging Zone: Position your sofa to maximize a prime view—whether it’s the sunset or the cityscape. Add a side table for your book and drink, creating a dedicated spot for solo relaxation.
- The Dining Corner: Flank one side of a sturdy outdoor dining table with a long pallet bench (just a single-pallet-height sofa!). It’s a casual, space-saving seating solution for al fresco meals.
Functional Add-Ons: DIY & Define the Space Use the same pallet spirit to create complementary pieces that add utility and character.
- Pallet Side Tables: Stack and secure two pallets (or cut one in half vertically) to create instant, rustic side tables. Add a glass or wooden top for a smooth surface.
- Pallet Planters: Disassemble pallets to create deep, narrow planter boxes for shrubs or tall grasses, adding privacy and greenery. Or, use a single, intact pallet leaned vertically against a wall as a vertical garden (the “pallet garden” hack).
- Centerpiece Fire Pit: Place a safe, portable bioethanol fire pit table or a contained metal fire bowl in the center of your layout. It becomes a mesmerizing focal point that extends your rooftop enjoyment into cooler evenings.
Lighting Ambiance: Set the Mood as the Sun Sets Lighting is the magic that makes your oasis usable and enchanting after dark.
- String Lights: The undisputed champion of cozy ambiance. Drape them overhead, along railings, or in trees. Choose warm white bulbs for a soft, inviting glow.
- Lanterns: Cluster weather-resistant lanterns (solar, battery-operated, or candle) on side tables or the ground. They add height, texture, and a flickering, intimate light.
- Solar-Powered Lamps: Tuck solar stake lights into planters or line pathways. They charge by day and automatically illuminate at night, requiring no wiring—perfect for rooftops.
Greenery: Your Lush, Living Layer Plants soften the hardscape, provide privacy, and connect you to nature.
- Potted Plants: Use a mix of heights and textures. Tall ornamental grasses or a small tree (like a Japanese maple in a large pot) create a canopy. Mid-height shrubs (boxwood, hydrangeas) add structure. Spillers like ivy or sweet potato vine soften edges.
- Herbs & Edibles: Incorporate potted herbs like rosemary, mint, and lavender. They smell amazing, are useful in the kitchen, and are often resilient in containers.
- Vertical Gardens: If floor space is limited, use wall-mounted planters or your pallet planter against a wall to grow a living tapestry of succulents or ferns.
By layering these elements—intentional layout, functional DIY pieces, atmospheric lighting, and lush greenery—you’ll create a cohesive, multi-sensory retreat. Your rooftop won’t just have a sofa; it will have a soul.
")
Pro-Tips & Maintenance
Your pallet sofa is built to last, but a little ongoing care will keep it looking great, feeling comfortable, and standing strong for seasons to come. Here’s how to be a savvy rooftop oasis owner.
Maximizing Comfort: Beat the Sag
- The Plywood Platform Trick: If you find your cushions dipping between the slats of the pallet, cut a piece of plywood to fit snugly inside the sofa frame on top of the pallets. This creates a solid, supportive base that prevents cushion sag and makes the seat feel more polished. For ventilation, you can drill a few small holes in the plywood.
- The Windy Rooftop Hack: Secure cushions on breezy days with discreet strips of hook-and-loop fastener (Velcro). Stick one side to the bottom of the cushion and the other to the pallet wood or plywood base. A few strategic spots will keep everything in place.
- Quick-Dry Comfort: Always opt for quick-dry foam cushions for outdoor use. If they do get caught in a shower, they’ll air out much faster than traditional stuffing, preventing mildew and that musty smell.
Seasonal Care: Love It for the Long Haul
- Regular Cleaning: Give your wooden frame a gentle wipe-down with a damp cloth every few months to remove dust and pollen. For cushions, a quick vacuum and a spot clean with a mild soap solution will keep them fresh.
- Off-Season Storage (For Harsh Climates): If you face freezing winters, snow, or heavy rain for months, extend your sofa’s life by storing it.
- Cushions & Textiles: Bring them indoors or into a dry, covered storage area. This is the single best thing you can do to preserve their color and fabric integrity.
- The Wood Frame: If possible, move the frame to a sheltered spot or cover it completely with a heavy-duty, waterproof tarp, ensuring it’s tied down securely. If it must stay put, a high-quality fitted furniture cover is a worthwhile investment.
- Annual Check-Up: At the start or end of each season, give your sofa a once-over. It’s the perfect time for the safety check below and to consider a fresh coat of sealant if the wood looks thirsty or faded.
Safety Check: The 10-Minute Tune-Up A sturdy build stays sturdy with minimal attention. Make this a seasonal ritual.
- The Screw Tightening Round: Wood expands and contracts with temperature and moisture. Go around with your drill/driver and tighten any screws that may have loosened over time, especially at key joints and brackets.
- Wood Integrity Scan: Look over the frame for any new cracks, significant splintering, or (in very wet climates) soft spots that could indicate rot. Small surface cracks are normal; sand them lightly if they become rough.
- Splinter Patrol: Run your hand along the arms and edges. If you feel any new roughness from weathering, a light sanding with fine-grit paper will quickly restore that smooth finish.
- Rust Prevention: Check any metal brackets, screws, or casters for signs of rust. A light sanding and a dab of touch-up paint (or rust converter) will stop it in its tracks.
By following these simple tips, your DIY creation will reward you with lasting comfort, style, and safety—proving that the best rooftop retreats are not just made, but lovingly maintained. Now, go enjoy that sunset. You’ve earned it.
Sit Back, Relax, and Enjoy
And there you have it—your roadmap from a stack of discarded pallets to a personalized, sun-drenched sanctuary high above the city streets. This journey has taken you through the thrill of the hunt, the satisfaction of the build, and the creativity of the styling, proving that incredible outdoor spaces aren’t bought, they’re built.
Look at what you’ve accomplished: a unique piece of furniture infused with pride from your own hands, significant savings in your wallet, and the quiet sustainability of a meaningful upcycle. You haven’t just assembled a sofa; you’ve crafted the centerpiece for countless memories to come—from morning coffees to starlit conversations.
Now, we’d love to see it! Tag us or share your own pallet sofa creations and rooftop oasis photos online using #PalletOasis. Your project might just be the inspiration someone else needs to start their own.
So, pour yourself a drink, fluff those cushions, and take it all in. Your ultimate urban escape is just a few pallets away.