
Introduction
Imagine transforming a bare wall, balcony, or small patio into a lush, thriving garden—without sacrificing precious floor space. That’s the magic of vertical gardening! Whether you’re an urban dweller with limited room or a plant lover looking to add a stunning green feature to your home, a vertical garden is a practical and beautiful solution.
Why Choose a Vertical Garden?
- Space-Saving Brilliance: Perfect for apartments, small yards, or even indoors.
- Aesthetic Appeal: Turn dull walls into vibrant living art.
- Improved Air Quality: Plants naturally filter toxins and boost oxygen levels.
- Easy Access: No bending over—harvest herbs or tend to flowers at eye level!
Why Beginners Should Try It
You don’t need a green thumb to succeed! Vertical gardens can be simple, modular, and low-maintenance, especially when you start with the right plants and setup. Plus, they’re a rewarding way to dip your toes into gardening without overwhelming chores.
What to Expect in This Guide
We’ll walk you through the entire process—from planning and building your structure to planting, watering, and maintaining your garden—with clear, beginner-friendly steps. By the end, you’ll have all the confidence (and inspiration!) to create your own sky-high oasis.
Ready to grow up? Let’s dig in!
1. Planning Your Vertical Garden
Before you start drilling holes or buying plants, a little planning will set you up for success. The right location, plant selection, and structure will determine how well your vertical garden thrives. Let’s break it down step by step.
Choosing the Right Location
Indoor vs. Outdoor
- Outdoor Vertical Gardens
- Best for: Herbs, vegetables, flowering plants
- Pros: More sunlight, natural rainfall (less manual watering)
- Cons: Exposure to pests and extreme weather
- Ideal spots: Balconies, fences, sunny exterior walls
- Indoor Vertical Gardens
- Best for: Low-light plants like pothos, ferns, or succulents
- Pros: Year-round growing, controlled environment
- Cons: Requires artificial lighting if no natural sunlight
- Ideal spots: Kitchen walls (for herbs), living room accent walls, or near bright windows
Sunlight Requirements
- Full Sun (6+ hours/day): Herbs (basil, thyme), vegetables (cherry tomatoes, strawberries), and flowering plants (petunias).
- Partial Shade (3–6 hours/day): Leafy greens (lettuce, spinach), ferns, and some succulents.
- Low Light (<3 hours/day): Pothos, snake plants, and peace lilies (great for indoor setups).
Pro Tip: Observe your chosen spot for a few days to track sunlight patterns before planting.
Selecting the Best Plants
Not all plants are suited for vertical growth. Consider these categories based on your goals:
1. Succulents (Low-Maintenance & Stylish)
- Examples: Sedum, echeveria, string of pearls
- Best for: Dry climates, indoor setups
- Why? They need little water and stay compact.
2. Herbs (Practical & Fragrant)
- Examples: Basil, mint, rosemary, parsley
- Best for: Kitchen walls, sunny balconies
- Why? Easy to harvest and perfect for cooking.
3. Flowers (Colorful & Eye-Catching)
- Examples: Petunias, begonias, nasturtiums
- Best for: Outdoor decorative walls
- Why? Attract pollinators and brighten spaces.
4. Vegetables (Edible & Space-Saving)
- Examples: Cherry tomatoes, lettuce, dwarf peppers
- Best for: Outdoor structures with strong support
- Why? Grow food in small spaces.
Rule of Thumb: Pick plants with similar light and water needs to simplify care.
Deciding on a Structure
Your vertical garden’s frame affects both function and aesthetics. Here are popular options:
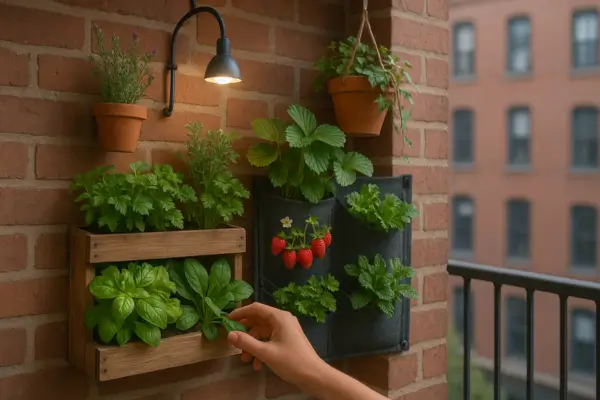
1. Wall-Mounted Planters
- Pros: Sleek, space-efficient, customizable layouts
- Cons: Requires drilling into walls
- Best for: Herbs, succulents, or decorative flowers
2. Freestanding Vertical Systems
- Pros: Portable, no wall damage, great for renters
- Cons: Takes up floor space
- Best for: Balconies or patios (e.g., tiered plant stands)
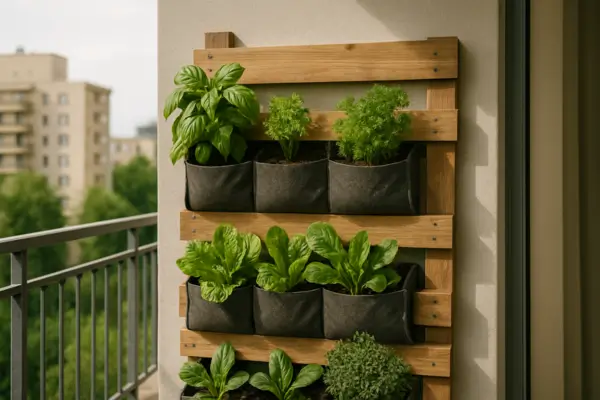
3. Hanging Pockets or Fabric Panels
- Pros: Lightweight, affordable, easy to install
- Cons: Limited soil capacity (smaller plants only)
- Best for: Strawberries, herbs, or trailing plants
4. Upcycled Pallets or Trellises
- Pros: Eco-friendly, rustic charm, DIY-friendly
- Cons: Requires sealing to prevent rot
- Best for: Outdoor gardens (vegetables or climbers like beans)
5. Modular Grid Systems
- Pros: Flexible design, scalable for large walls
- Cons: Higher initial cost
- Best for: Modern indoor/outdoor installations
Final Tip: Match the structure’s material to your environment (e.g., use weather-resistant wood or metal outdoors).
Next Steps:
Now that you’ve planned your garden’s location, plants, and structure, it’s time to gather materials! [Link to next section: Gathering Materials & Tools].
Question for Readers:
Which plants or structures are you considering for your vertical garden? Share in the comments!
")
2. Gathering Materials & Tools for Your Vertical Garden
Before you start building, it’s essential to have everything you need on hand. Whether you’re going for a sleek modular system or a rustic DIY project, this checklist will ensure you’re prepared.
Essential Materials
1. Growing Containers or Planters
- Options:
- Fabric pocket panels (lightweight, great for herbs)
- Plastic or ceramic wall planters (durable, stylish)
- Wooden pallets or crates (rustic, customizable)
- PVC pipes or gutters (for hydroponic setups)
2. Quality Soil & Growing Medium
- Potting Mix: Lightweight, well-draining soil (avoid garden soil—it’s too heavy).
- Specialty Mixes:
- Cactus/succulent mix for drought-tolerant plants.
- Peat-free compost for eco-friendly gardening.
- Alternative: Coconut coir (retains moisture well).
3. Plants or Seeds
- Buy young plants (“starts”) for faster results, or seeds for a budget-friendly option.
- Tip: Choose compact or trailing varieties for vertical growth.
4. Irrigation System
- Basic: Watering can (for small setups).
- Automated: Drip irrigation kit with a timer (ideal for larger gardens).
- DIY Hack: Repurpose plastic bottles as self-watering reservoirs.
5. Mounting Hardware
- For Walls: Heavy-duty hooks, brackets, or a trellis frame.
- For Freestanding Units: Sturdy base or weighted supports.
- Waterproofing: Liner or backing board (if attaching to a wall to prevent moisture damage).
Recommended Tools
You don’t need a full workshop, but these tools will make assembly easier:
- Drill & Bits – For mounting planters or creating drainage holes.
- Screws & Wall Anchors – Ensure stability (use rust-proof options for outdoor setups).
- Level – Keeps your garden straight (crooked planters = messy look!).
- Scissors/Pruners – For trimming plants and cutting materials.
- Staple Gun or Zip Ties – Helps secure fabric panels or mesh.
- Measuring Tape – Precision avoids uneven spacing.
Optional but Helpful:
- Stud Finder (if mounting on drywall).
- Waterproof Sealant (for wooden structures).
Budget-Friendly DIY Alternatives
Want to save money? Try these creative swaps:
1. Containers
- Old Shoe Organizer → Fabric pocket planter (just add soil!).
- Plastic Bottles → Cut horizontally, mount sideways for mini planters.
- Wooden Pallets → Free or cheap (sand and seal before use).
2. Irrigation
- Wine Bottle Trick – Fill with water, invert into soil for slow drip.
- String Wicking System – Cotton strings draw water from a reservoir to roots.
3. Mounting
- Command Hooks – No-drill option for lightweight planters (renters, rejoice!).
- Old Ladder – Lean against a wall for a tiered vertical garden.
Pro Tip: Check local buy-nothing groups or upcycle household items before buying new!
What’s Next?
With materials ready, it’s time to build your frame and install your garden! [Link to next section: Building the Vertical Garden Frame].
Question for Readers:
What’s your favorite budget hack for gardening? Share your DIY ideas below! 🌿

3. Building the Vertical Garden Frame
Now that you’ve gathered your materials, it’s time to construct the backbone of your vertical garden—the frame. Whether you’re mounting it on a wall or building a freestanding structure, this step-by-step guide will ensure stability, functionality, and proper drainage.
Step-by-Step Assembly Instructions
1. Prep Your Materials
- Lay out all components (planters, frame, hardware).
- If using wood (like pallets or lattice), sand rough edges and apply a waterproof sealant.
- Pre-drill holes in planters for drainage (if they don’t have any).
2. Assemble the Frame
For Wall-Mounted Systems:
- Modular Panels: Connect interlocking pieces according to the manufacturer’s instructions.
- DIY Lattice/Pallet: Secure slats with screws, leaving gaps for plants.
- Fabric Pocket Panels: Hang first, then fill with soil (no assembly needed).
For Freestanding Units:
- Tiered Planters: Stack pots or shelves, ensuring each level is stable.
- Ladder Garden: Secure shelves or trays across rungs.
- A-Frame Trellis: Nail or screw crossbeams for support.
Pro Tip: Use a level at every step to prevent a lopsided garden!
Securing the Frame
Wall-Mounted Options:
- Find Studs – Use a stud finder to anchor into wood/metal framing (not just drywall).
- Heavy-Duty Anchors – For brick/concrete, use masonry screws and wall plugs.
- Distribute Weight – Attach brackets at multiple points to prevent sagging.
Freestanding Bases:
- Wide Footprint – Prevent tipping by ensuring the base is wider than the top.
- Add Weight – Place sandbags or pavers at the bottom for stability.
- Outdoor? Stake into the ground or use weighted planters at the base.
Safety Check: Give the frame a gentle shake test—if it wobbles, reinforce it.
Ensuring Proper Drainage
Poor drainage = root rot. Here’s how to avoid it:
1. Drainage Holes
- Every planter (even pockets) needs holes at the bottom.
- Drill ¼-inch holes spaced 2–3 inches apart.
2. Drainage Layer
- Add a 1-inch layer of gravel, perlite, or broken pottery at the base of planters.
- For fabric pockets, use a coarse soil mix (add extra sand or bark).
3. Waterproof Backing (For Walls)
- Attach a plastic liner or waterproof membrane behind the frame to protect walls.
- Leave a small gap between the wall and planters for airflow.
4. Catchment System
- Place a drip tray or gutter at the bottom to collect excess water (especially indoors).
- For outdoor setups, angle planters slightly forward so water runs off.
Bonus Tip: Test drainage by watering a trial planter before planting—adjust if water pools.
What’s Next?
With your frame built and secured, it’s time for the fun part—planting! [Link to next section: Planting & Arranging Your Garden].
Reader’s Corner:
What’s your biggest challenge with vertical garden structures? Share below, and we’ll help troubleshoot!
4. Planting & Arranging Your Vertical Garden
Now comes the most rewarding part – bringing your vertical garden to life with plants! Proper planting techniques and thoughtful arrangement will ensure your garden thrives while creating a stunning living display. Follow these expert tips for success.
Preparing the Soil or Growing Medium
Choosing the Right Mix
- Lightweight potting mix is essential – look for blends with perlite or vermiculite
- Avoid garden soil – it’s too dense and may contain pests
- Specialty mixes:
- Succulents: Fast-draining cactus/sand mix
- Herbs: Nutrient-rich blend with compost
- Edibles: Organic vegetable potting soil
Enhancing Your Soil
- Mix in water-retaining crystals for hot climates
- Add slow-release fertilizer for continuous feeding
- For fabric planters, include coconut coir to prevent compaction
Pro Tip: Moisten soil before planting – it should clump but not drip water when squeezed
Arranging Plants for Optimal Growth
Light Considerations
- Top Sections: Place sun-loving plants (herbs, flowers) where light is strongest
- Middle Sections: Partial-sun plants (leafy greens, some herbs)
- Bottom Sections: Shade-tolerant varieties (ferns, mint)
Spacing Guidelines
- Allow 2-3 inches between small plants
- 4-6 inches for larger plants or fast growers
- Trailing plants need extra space to hang down
Aesthetic Arrangement
- Color Contrast: Alternate foliage colors (silver-green, purple, variegated)
- Texture Mix: Combine spiky (succulents) with soft (ferns)
- Focal Points: Place showstoppers (flowering plants) at eye level
Design Tip: Arrange plants on the ground first to visualize the layout
Planting Techniques for Different Setups
Pocket Planters
- Loosen roots gently if pot-bound
- Tuck plants into pockets at a slight upward angle
- Firm soil around roots to eliminate air pockets
Wall-Mounted Trays/Boxes
- Plant in a staggered pattern for full coverage
- Place taller plants toward the back
- Use small starter plants rather than seeds
Pallet Gardens
- Lay pallet horizontally to plant
- Fill with soil between slats
- Insert plants through openings
- Secure landscape fabric backing
- Stand upright when complete
Hydroponic Systems
- Use net pots with clay pebbles
- Ensure roots make contact with nutrient solution
- Start with established seedlings
Aftercare Tip: Water thoroughly after planting and mist leaves for the first few days
Pro Tips for Success
- Acclimate plants gradually if moving from indoors to outdoors
- Label plants with small tags until established
- Start small – you can always add more plants later
- Group plants with similar water needs together
Common Mistake to Avoid: Overcrowding – remember plants will grow!
What’s Next?
Your vertical garden is planted! Next we’ll cover how to keep it thriving with proper watering techniques. [Link to next section: Setting Up an Irrigation System]
Let’s Discuss:
What’s your favorite plant combination for vertical gardens? Share your designs in the comments! 🌿

5. Setting Up an Irrigation System for Your Vertical Garden
A proper watering system is the lifeline of your vertical garden. Unlike traditional gardens, vertical setups dry out faster and require special attention to irrigation. Let’s explore the best watering solutions to keep your plants thriving with minimal effort.
Watering Options for Vertical Gardens
1. Drip Irrigation (Most Efficient)
Best for: Large or complex vertical gardens
- How it works: Network of tubes with emitters delivers water directly to each plant
- Pros:
- Precise water delivery
- Automated with timer
- Reduces water waste
- Cons:
- Higher initial cost
- Requires installation
Installation Tip: Place emitters at the top and let water trickle down to lower plants
2. Self-Watering Planters (Low Maintenance)
Best for: Small to medium vertical gardens
- How it works: Reservoir system wicks moisture to roots as needed
- Pros:
- Reduces watering frequency
- Prevents over/underwatering
- Cons:
- Limited to compatible planters
- Requires occasional reservoir refills
DIY Hack: Convert regular planters by adding a water reservoir and wicking rope
3. Manual Watering (Simple Start)
Best for: Small vertical gardens or beginners
- Methods:
- Watering can with long spout
- Hose with gentle spray attachment
- Pros:
- No installation required
- Direct observation of plant needs
- Cons:
- Time-consuming
- Easy to miss spots
Pro Technique: Water slowly in sections to ensure complete saturation
Preventing Watering Problems
Avoiding Overwatering
- Check soil moisture with finger before watering
- Ensure all containers have drainage holes
- Reduce frequency in cool/cloudy weather
- Watch for yellowing leaves or mold
Preventing Underwatering
- Monitor plants during heat waves
- Use moisture-retaining soil additives
- Group plants with similar water needs
- Look for wilted or crispy leaves
Smart Solution: Install moisture sensors to monitor soil conditions
Automating Your Watering System
Timer Systems
- Basic battery-operated timers ($15-$30)
- Smart WiFi controllers (remote control via phone)
- Solar-powered options for outdoor gardens
Gravity-Fed Systems
- Elevated water reservoir with drip lines
- No electricity required
- Adjust flow with control valves
Recirculating Hydroponic Systems
- Closed-loop water circulation
- Nutrient-rich solution
- Ideal for edible gardens
Automation Tip: Set watering for early morning to reduce evaporation loss
Seasonal Watering Adjustments
- Spring/Fall: Water every 2-3 days
- Summer: Daily watering may be needed
- Winter: Reduce to weekly (or pause for dormant plants)
Water-Saving Strategy: Collect rainwater in barrels for irrigation
What’s Next?
Now that your irrigation is set up, learn how to maintain your vertical garden for long-term success. [Link to next section: Maintenance & Care Tips]
Let’s Discuss:
Have you tried any innovative watering solutions for your vertical garden? Share your experiences below!
6. Maintenance & Care Tips for Your Vertical Garden
Keeping your vertical garden thriving requires regular attention, but don’t worry—these simple maintenance routines will quickly become second nature. Let’s break down exactly how to care for your living wall throughout the seasons.
Regular Upkeep Essentials
Pruning & Grooming
- Weekly: Remove yellow/dead leaves to prevent disease
- Bi-weekly: Pinch back leggy growth to encourage bushiness
- Monthly: Trim aggressive growers to maintain shape
- Special Care: Deadhead flowers to prolong blooming
Pro Tip: Use clean, sharp scissors to make clean cuts that heal faster
Fertilizing Schedule
- Liquid fertilizer: Every 2 weeks during growing season
- Slow-release granules: Every 3 months mixed into topsoil
- Organic options: Compost tea or worm castings monthly
- Winter: Reduce to monthly or pause entirely
Remember: Vertical gardens need more frequent feeding due to limited soil volume
Pest Control Strategies
- Prevention:
- Inspect new plants before adding
- Maintain good air circulation
- Avoid overwatering
- Common Pests:
- Aphids: Blast with water or use insecticidal soap
- Spider mites: Wipe leaves with neem oil solution
- Mealybugs: Dab with cotton swab dipped in alcohol
Eco-Friendly Solution: Introduce ladybugs or lacewings as natural predators
Seasonal Adjustments
Spring Refresh
- Replace 30% of soil annually
- Divide overcrowded plants
- Start new seeds for rotation
Summer Care
- Increase watering frequency
- Provide afternoon shade if needed
- Watch for heat stress signs
Fall Preparation
- Transition cold-sensitive plants indoors
- Reduce fertilizing
- Clean debris to prevent disease
Winter Protection
- Move sensitive plants to sheltered areas
- Consider grow lights for indoor gardens
- Reduce watering but prevent complete drying
Climate Tip: Use frost cloth for unexpected cold snaps
Troubleshooting Common Issues
Wilting Plants
- Overwatering: Let soil dry out, improve drainage
- Underwatering: Deep water, add water-retaining crystals
- Root-bound: Gently loosen roots and repot
Mold/Fungal Growth
- Improve air circulation
- Reduce watering frequency
- Apply cinnamon (natural fungicide)
- Remove affected leaves immediately
Insufficient Growth
- Check sunlight exposure
- Test soil pH (ideal 6.0-7.0 for most plants)
- Increase fertilizer strength
- Consider root space limitations
Leaf Discoloration
- Yellow leaves: Often overwatering
- Brown tips: Usually underwatering or salt buildup
- Pale leaves: Typically nutrient deficiency
Quick Fix: Flush soil with clean water monthly to prevent salt accumulation
Monthly Maintenance Checklist
- Inspect for pests/disease
- Wipe dust from leaves
- Check irrigation system function
- Rotate plants for even growth
- Trim and tidy appearance
Bonus: Keep a garden journal to track what works best
What’s Next?
Now that you’re a vertical garden care expert, get inspired with creative design ideas to take your garden to the next level! [Link to next section: Creative Design Ideas for Vertical Gardens]
We’d Love to Know:
What’s your biggest vertical garden challenge? Share below and our community might have the perfect solution!
")
7. Creative Design Ideas for Your Vertical Garden
Your vertical garden isn’t just functional—it’s a living work of art! Whether you want a rustic herb wall, a vibrant floral tapestry, or an ultra-modern succulent display, these design ideas will inspire you to create something truly unique.
Themed Vertical Gardens
1. Culinary Herb Wall
Perfect for: Kitchen walls, patio gardens, or urban balconies
- Plant Selection: Basil, thyme, rosemary, mint, parsley, chives
- Design Tips:
- Group herbs by frequency of use (daily cooks vs. occasional)
- Label with charming plant markers
- Add edible flowers (nasturtiums, pansies) for pops of color
- Bonus: Install near a grill or outdoor dining area for fresh seasoning on demand
2. Floral Tapestry (Living Wall Art)
Perfect for: Entryways, fence coverings, or balcony privacy screens
- Plant Selection: Petunias, begonias, lobelia, ivy (for trailing effects)
- Design Tips:
- Create patterns with contrasting colors (stripes, checkerboards)
- Use flowering annuals for seasonal refreshes
- Mix in foliage plants (coleus, caladium) for texture
3. Succulent Mosaic (Low-Maintenance Beauty)
Perfect for: Sunny indoor walls or drought-prone climates
- Plant Selection: Echeveria, sedum, sempervivum, string of pearls
- Design Tips:
- Arrange by color gradients (pastels to deep purples)
- Use geometric frames for a modern look
- Leave space for growth—succulents expand over time
Upcycled & Eco-Friendly Designs
1. Pallet Garden (Rustic Charm)
- How-To:
- Sand and seal a wooden pallet
- Line with landscape fabric, fill with soil
- Plant between slats or attach small pots
- Best For: Herbs, strawberries, or cascading flowers
2. Bottle Garden (Plastic to Pretty)
- How-To:
- Cut recycled bottles horizontally
- Mount on a wooden frame or fence
- Use for small herbs, lettuce, or trailing plants like ivy
- Pro Tip: Paint bottles for a cohesive look or leave clear for a modern vibe
3. Vintage Shelf Garden (Shabby Chic)
- How-To:
- Repurpose an old bookshelf or ladder
- Add potted plants at different heights
- Mix in decorative elements (lanterns, small garden tools)
- Best For: A curated, eclectic look
Eco Bonus: Use rainwater collection systems to irrigate upcycled gardens!
Color & Texture Combinations
1. Monochromatic Elegance
- Example: All-white blooms (white petunias, dusty miller, sweet alyssum)
- Effect: Serene, sophisticated, and luminous at night
2. Bold Contrasts
- Example: Purple basil + golden creeping Jenny + red begonias
- Effect: Eye-catching and energetic
3. Texture Play
- Soft & Feathery: Ferns, asparagus grass
- Spiky & Structural: Yucca, agave, blue fescue
- Trailing & Flowing: Sweet potato vine, ivy, bacopa
Design Trick: Place coarse textures at the bottom, delicate ones higher up for balance.
Bringing It All Together
- Small Space? Try a “vertical salad bar” with lettuce, spinach, and edible flowers.
- Urban Modern? Opt for a modular metal grid with air plants and succulents.
- Cottage Style? A flowering window box tower adds instant charm.
Question for You:
Which design speaks to your style—minimalist succulent art or a wildflower explosion?
")
8. Troubleshooting & FAQs for Vertical Gardens
Even the most well-planned vertical gardens can run into challenges. This section answers your most pressing questions and provides solutions to common problems—so you can keep your green wall thriving for years to come.
Common Problems & Quick Fixes
1. Poor Drainage (Soggy Soil, Root Rot)
Signs: Yellowing leaves, mold, musty smell
Solutions:
✔️ Add more drainage holes to planters
✔️ Mix perlite or coarse sand into soil
✔️ Elevate planters slightly to let water escape
2. Plant Overcrowding (Stunted Growth, Disease Spread)
Signs: Leaves competing for light, roots pushing out of soil
Solutions:
✔️ Thin plants regularly—remove weakest growers
✔️ Replant aggressive spreaders (like mint) in separate containers
✔️ Follow spacing guidelines (check plant tags)
3. Pests (Aphids, Spider Mites, Mealybugs)
Signs: Sticky residue, webbing, distorted leaves
Solutions:
✔️ Spray with water to dislodge pests
✔️ Apply neem oil or insecticidal soap weekly
✔️ Introduce beneficial insects (ladybugs love aphids!)
Pro Tip: Quarantine new plants for a week before adding to your vertical garden.
Frequently Asked Questions
1. “How often should I water my vertical garden?”
- Outdoors: 3-5 times/week in summer, less in cooler months
- Indoors: 1-2 times/week (check soil moisture first)
- Test: Stick your finger 1″ deep—water if dry
2. “Will a vertical garden damage my walls?”
- No, if you:
✅ Use a waterproof backing (like plastic sheeting)
✅ Install proper mounting hardware (avoid drilling into drywall alone)
✅ Choose lightweight systems (fabric panels under 15 lbs when wet)
3. “What are the best plants for shady/sunny spots?”
- Full Sun (6+ hours): Herbs (basil, rosemary), succulents, cherry tomatoes
- Partial Shade (3-6 hours): Lettuce, ferns, begonias, mint
- Low Light (<3 hours): Pothos, snake plants, philodendron
4. “Why are my plants wilting even with regular watering?”
- Could be overwatering (check for soggy soil)
- Or root-bound plants (repot if roots circle tightly)
- Heat stress? Add shade cloth during peak sun
5. “Can I grow vegetables vertically?”
- Yes! Best picks:
- Cherry tomatoes (use cages)
- Pole beans (train on trellises)
- Strawberries (hanging pockets work great)
When to Revamp or Expand
Signs You Need a Refresh
- Plants outgrow their space (roots visible at drainage holes)
- Soil becomes compacted or depleted (slow growth, poor drainage)
- Design looks messy (overgrown or uneven plant health)
How to Expand Successfully
- Add New Modules: Connect additional panels to your existing system
- Rotate Plants: Swap tired plants with seasonal varieties
- Upgrade Irrigation: Install a larger reservoir or automated timer
Ideal Times for Major Changes:
- Early Spring: Prep for growing season
- Early Fall: Refresh before winter dormancy
Final Tip: Take photos monthly to track your garden’s progress!
Got More Questions? Drop them in the comments—we’re happy to help!
Conclusion:
Start Your Vertical Garden Journey Today!
Congratulations—you’re now equipped with everything you need to create a stunning vertical garden! From choosing the right plants to troubleshooting common issues, you’ve learned how to transform any small space into a lush, thriving oasis.
Why a Vertical Garden is Worth It
✔ Maximizes Space – Perfect for balconies, patios, or even indoor walls.
✔ Boosts Curb Appeal – Turns dull walls into eye-catching living art.
✔ Simplifies Gardening – No bending or kneeling—just easy, elevated care.
✔ Grows Fresh Food – Harvest herbs, veggies, and strawberries at arm’s reach.
Your Next Steps
- Pick a Spot – Start small with a sunny wall or balcony corner.
- Choose Your Style – Upcycled pallet? Sleek modular panels? A pocket herb garden?
- Plant with Confidence – Use what you’ve learned about soil, spacing, and watering.
Remember: Every gardener learns by doing. Don’t worry about perfection—just enjoy the process!
We’d Love to Hear From You!
- Have questions? Ask below—we’re happy to help!
- Already started? Share photos of your vertical garden in the comments!
- Need inspiration? Check out our gallery of reader-submitted designs [link].
Happy planting! 🌿 Your green wall adventure starts now.