
The “Trash”: Introduction & Inspiration
This is our new kitchen island. It’s the functional heart of our kitchen, providing precious extra counter space for baking, a landing zone for groceries, and deep drawers that finally corral our pots and pans. But just a few weeks ago, the pieces that make up this centerpiece were considered worthless—destined for the landfill.
Our kitchen, like so many, was a study in poor workflow. We had a single, narrow stretch of counter between the stove and sink, a “landing strip” that constantly disappeared under mail, recipe books, and hot pans with nowhere to go. We needed more surface area and storage, but the budget for a custom-built or store-bought island was firmly in the “someday” category. That “someday” arrived unexpectedly on a rainy Thursday, not with a delivery truck, but with a pile of someone else’s trash.
There they were: two grimy, outdated base cabinets sitting forlornly on the curb during a neighborhood clean-up day. Their doors were scuffed, the finish was a tired honey oak, and one was missing a hinge. Most people would see junk. We saw potential. In that moment, the upcycling ethos clicked perfectly—why buy new when we could redirect perfectly solid materials and give them a second life? It was a free foundation for our solution.
This project proves that with some vision, a bit of planning, and a healthy dose of elbow grease, you can transform forgotten pieces into a stunning, functional centerpiece. This is the story of how we turned literal trash into our kitchen’s greatest treasure.

Treasure Mapping: Planning & Design
(Insert a raw, unglamorous photo here: The two cabinets sitting in our garage, looking grimy and disjointed against a concrete floor.)
Before any painting or assembly could begin, we needed a plan. The excitement of the “find” had to meet the reality of the “build.” This phase was all about measuring twice, dreaming big, and making smart, budget-conscious decisions.
Assessing the “Find”: Our treasure trove consisted of two identical base cabinets. Both were structurally sound—no water damage or major cracks—but aesthetically, they were stuck in the 90s. They featured:
- Style: A classic shaker-style door frame (a plus!), drowned in a faded, orange-toned oak veneer.
- Condition: Heavy grime, scratches, and sticky residue on the drawers. One door was slightly warped, and all the original brass hinges were tarnished.
- Size: Each box was 24 inches wide and 24 inches deep, a standard but useful size. Together, they would give us a 48-inch long island base—perfect for our space.
Vision & Sketch: Laying them side-by-side on the garage floor, the vision clicked into place. By joining them, we would create a single, substantial unit. We sketched a quick diagram: two cabinets forming the base, a sturdy countertop overhanging one side for bar stool seating, and a fresh coat of paint to unite them. That simple drawing was our roadmap from “trash” to “treasure island.”
Design Decisions:
- Layout: We chose a side-by-side configuration to maximize the countertop length and create a familiar cabinet bank look. We decided to include a 12-inch overhang on one long side to accommodate two counter-height stools, creating a casual eating spot.
- Function: We wanted to blend closed storage with accessible features. We planned to:
- Keep the existing deep drawer in one cabinet for utensils and tools.
- Convert the door on the other cabinet to an open shelving niche for cookbooks and decorative baskets.
- Add a hand towel bar on one end for practicality.
- Aesthetic:
- Paint Color: We selected a matte, deep sage green. It felt warm and modern, a dramatic departure from the orange oak, and would complement our kitchen’s light walls.
- Hardware: We opted for simple, brushed nickel bin pulls for the drawer and a matching towel bar for a clean, unified look.
- Countertop: Budget was key. We chose edge-glued pine butcher block from a home improvement store. It offered a warm, durable surface we could cut and finish ourselves for a fraction of the cost of stone.
Tools & Materials Checklist: Beyond our two free cabinets, here’s what we needed to gather:
- For Construction:
- 2×4 lumber (for a reinforcing internal frame and toe-kick)
- Wood screws (1.5″, 2.5″, and 3″)
- Wood glue
- Corner braces (for securing the countertop)
- For Prep & Finish:
- Degreaser & sandpaper (60, 120, and 220 grit)
- Primer suitable for laminate/veneered wood
- Sage green paint (satin or matte finish for cabinets)
- Foam rollers and angled brush
- Wood conditioner, stain, and food-safe sealant (for the butcher block)
- For New Features:
- Butcher block countertop
- Towel bar and bin pull hardware
- Optional: pine board and brackets for open shelving.
With our plan solidified and our supplies listed, the real transformation was ready to begin. The “treasure map” was complete; now it was time to start digging.
")
The Transformation: Step-by-Step Build
This is where the magic—and the sawdust—really started to fly. Moving from planning to action was incredibly satisfying. We broke the work down into three clear phases to keep the project manageable and our motivation high.
Phase 1: Demolition & Prep First, we had to make a mess to make things clean. We carried the cabinets into the garage and got to work.
- Deep Clean: We scrubbed every surface, inside and out, with a degreaser (TSP substitute works great) to remove years of kitchen grime and sticky residue. This step is non-negotiable for good paint adhesion.
- Strip Down: Off came all the old doors, drawers, and hardware. We unscrewed the tarnished hinges and removed the dated knobs. Suddenly, we were left with just the carcasses—the blank canvas.
- Surface Prep: We sanded every surface we planned to paint with 120-grit sandpaper. We didn’t need to strip the old veneer completely, just to “scuff-sand” it thoroughly to create a rough surface for the primer to grip. We wiped away all the dust with a damp tack cloth.
- Structural Check: We tightened any loose joints with wood glue and clamps and used wood filler to repair a small chip on one corner. Good bones are key!
Phase 2: Assembly & Construction With our prepped cabinet boxes, we began building our island’s foundation.
- Joining the Boxes: We placed the two cabinets side-by-side, ensuring their faces were perfectly aligned. We drilled pilot holes and used 2.5″ wood screws through the internal side panels to securely fasten them together. For extra strength, we added a continuous 1×3 wood strip along the top inside edge, screwing both cabinets into it.
- Building the Base Frame: A floating island looks odd. We built a simple rectangular frame from 2x4s to act as a sturdy toe-kick and leveling base. We made sure it was perfectly square, then screwed the assembled cabinet boxes down onto this frame from the inside. This lifted the unit off the floor and provided a rock-solid foundation.
- Creating the Open Shelf: Following our plan, we removed the door from one cabinet opening. We cut a pine shelf to size, sanded it smooth, and installed it using adjustable shelf pins, creating a perfect spot for our favorite cookbooks.
- Adding the Towel Bar: We measured and mounted the brushed nickel towel bar to the side panel of the cabinet, predrilling holes to prevent splitting the wood.
Phase 3: The Finishing Touches Now for the details that would make it look like a cohesive, finished piece of furniture.
- Priming and Painting: We applied a high-quality bonding primer designed for slick surfaces. Once dry, we used a foam roller for flat surfaces and an angled brush for edges to apply two even coats of our sage green paint. Pro-tip: Lightly sand with 220-grit sandpaper between coats for a glass-smooth finish.
- Installing New Hardware: We measured meticulously, used a template to ensure even placement, and attached our new bin pull to the drawer front. The instant upgrade was astounding!
- Fabricating the Countertop: We measured our island base (remembering the 12-inch overhang) and had the butcher block cut to size at the store. At home, we sanded the edges smooth, applied wood conditioner, and followed with three coats of food-safe mineral oil sealant, allowing each coat to dry thoroughly.
- Final Installation: We enlisted a helper for this part. We positioned the island in its new home, used a long level to make sure it was perfectly level in all directions (shimming under the base frame if necessary), and then secured the butcher block countertop to the cabinet bases using corner braces screwed up from inside the cabinets.
With the countertop secured, we stood back. The transformation was complete. A pair of discarded cabinets was now a single, unified, and utterly essential kitchen island.
")
The Big Reveal: Showcasing the “Treasure”
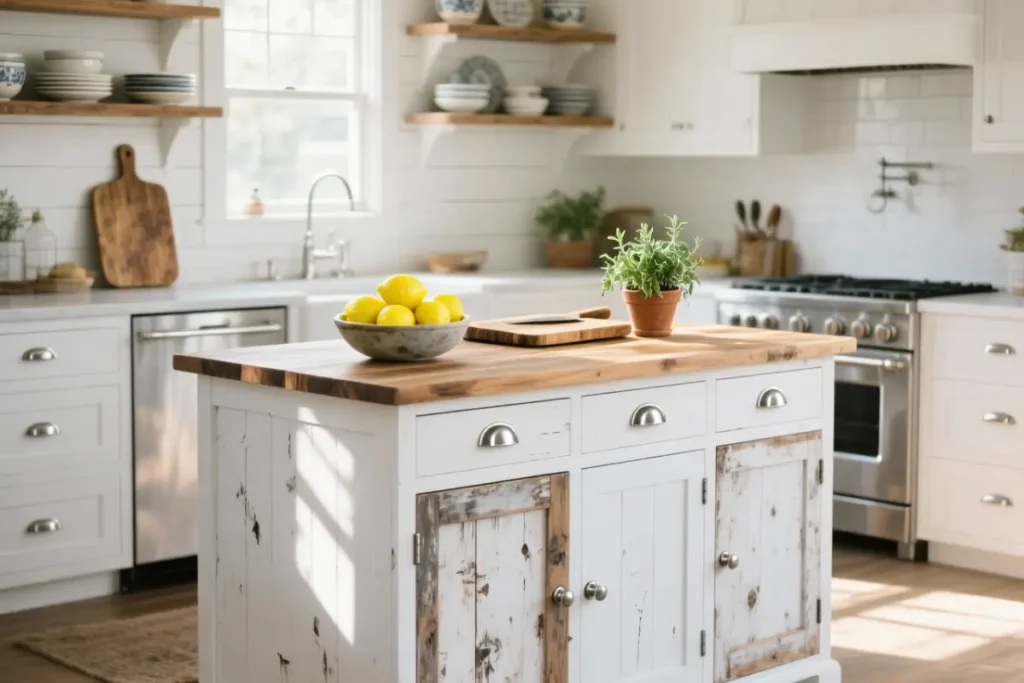
1. The Hero Shot: (A wide-angle photo showing the entire island in its kitchen context. It’s centered, with a pendant light hanging above it, proving it’s the new focal point of the room.)
This is it—the moment where our curb-find fantasy became a beautiful, hardworking reality. Here is our custom kitchen island, fully integrated into the heart of our home. The sage green base grounds the space, while the warm wood countertop adds instant warmth and character. It doesn’t just fit in our kitchen; it completely transforms it.
2. Detail Shots: The Devil’s in the Design (Close-up photo of the drawer and hardware) The new brushed nickel bin pull feels substantial and sleek against the matte green. That first smooth pull of the drawer, now packed with kitchen tools, is a daily small joy.
(Close-up photo of the open shelving niche) Our custom open shelf, painted the same green inside for a cohesive look, holds a stack of well-loved cookbooks and a woven basket for napkins. It breaks up the solid planes and adds useful, accessible storage.
(Close-up photo of the towel bar end and countertop grain) A simple towel bar adds practical charm. And the rich grain of the sealed butcher block? Each knot and variation tells the story of its material—natural, durable, and full of life.
3. Styled & In Use: A Living Centerpiece (Photo of the island styled: a wooden bowl filled with lemons and green apples on the countertop, a vase with fresh herbs, and a cup of coffee beside an open cookbook on the overhang.) It’s not just for show. This island is built for living. The overhang creates a perfect spot for a morning coffee or a quick lunch. The countertop is a dedicated baking station, a buffet for gatherings, and the ultimate landing pad for groceries.
(Optional second styled shot: a pizza being rolled out on the counter, flour and all, showcasing its use as a true workspace.) It handles messes, meals, and memories with equal grace. The finish is tough, the storage is deep, and the pride? That’s the best part of all.
The journey from two discarded boxes to this—a beautiful, one-of-a-kind piece that solves our kitchen’s biggest problems—is the ultimate reward. The “treasure” isn’t just the island itself; it’s the confidence, the story, and the significant savings that came with building it ourselves.
")
Lessons from the Dumpster: Tips & Takeaways
Every project, especially one born from salvaged materials, comes with its own set of lessons. Beyond the finished piece, this is the real treasure—the knowledge gained and the confidence built. Here’s our honest breakdown and our best advice for your own upcycling adventure.
Cost Breakdown: The Numbers Don’t Lie Let’s talk about the most satisfying part: the savings. A comparable pre-made kitchen island, or having one custom-built, can easily run from $800 to $2,000+. Our total out-of-pocket cost?
- Cabinets: $0 (Curb-side find)
- Butcher Block Countertop: $120 (on sale)
- Paint, Primer, & Supplies: $45
- Hardware (Pull & Towel Bar): $25
- Lumber for Frame/Toe-kick & Screws: $18
- Sandpaper, Sealant, etc.: $15
- TOTAL COST: ~$223
The math is compelling. For under $250, we gained a custom, solid-wood-top island that perfectly fits our space and style. The investment was in time and creativity, not in a hefty credit card bill.
Key Learnings: The Good, The Tricky, & The “Next Time”
- Easier Than Expected: The actual assembly—joining the boxes, building the frame—was straightforward with basic tools. The transformative power of paint and new hardware is almost instant magic.
- Harder Than Expected: Getting a perfectly smooth, professional paint finish on laminate veneer required patience. The crucial steps were the thorough degreasing, the bonding primer, and light sanding between coats. Rushing here shows.
- What We’d Do Differently: We would have invested in full-extension drawer slides when we had the drawer out. The existing slide is functional, but an upgrade would have been the cherry on top for usability.
Pro-Tips for Aspiring Upcyclers:
- Hunting Grounds: Don’t just drive around on trash day! Check Facebook Marketplace, Craigslist “Free” section, and local Buy-Nothing groups. Habitat for Humanity ReStore is a goldmine for building materials. Also, ask friends and family during renovations—their “trash” is your treasure.
- Assessing Structural Soundness: Avoid pieces with major water damage (soft, spongy wood), severe pest evidence, or broken structural joints. Cosmetic issues like ugly paint, scratches, or dated hardware are perfect—they’re cheap to fix. Always open drawers and doors; it’s the box’s integrity that matters most.
- Embrace the Imperfections: That small dent on the side? That’s character. The slightly uneven grain in the wood? That’s history. Upcycling isn’t about creating a flawless, factory-made replica. It’s about preserving the story and adding your own chapter. The quirks are what make it uniquely yours.
A Final Word of Encouragement: You do not need to be a master carpenter or a painting pro to do this. You need a vision, a willingness to learn, and the courage to start. Begin with a small piece—a nightstand, a side table. Celebrate the process of making something with your own hands. The first brushstroke of paint over an old finish is an act of creation. Enjoy it. Your treasure is out there, waiting for you to see its potential.
Conclusion
This journey from trash to treasure gave us so much more than just a new piece of furniture. It provided the profound satisfaction of rescuing perfectly good materials from the landfill, of solving a problem with creativity instead of cash, and of building something with our own hands that will serve our home for years to come.
Our kitchen has been utterly transformed. We gained the functional upgrades we desperately needed: generous counter space, deep storage, and a casual eating spot. But we also received an aesthetic gift: a unique, character-filled centerpiece that radiates warmth and tells a story of renewal every single day.
The proof is in the pudding—or, in this case, the pizza dough rolled out on that sturdy butcher block. You don’t need a massive budget to dramatically improve your space. You just need a vision, a little ingenuity, and the willingness to see potential where others see waste.
Your upcycling adventure is waiting. What’s sitting in your garage, on your local marketplace, or even out on the curb? What could it become? Share your dream project ideas or your own trash-to-treasure stories in the comments below—we’d love to be inspired by you!