
Let’s be honest: furnishing a micro-apartment can feel like an impossible puzzle. You’re dreaming of a stylish, functional lounge area—a place to unwind, entertain, and actually live—but you’re staring down a floor plan measured in inches and a budget measured in pennies. That sleek, modular sofa from the fancy design catalog? It costs more than your rent and would swallow your entire living room whole. The struggle between aspiration and reality is real.
But what if the perfect, budget-friendly building block for your dream seating was hiding in plain sight all along? Enter the humble milk crate. Dirt-cheap, incredibly sturdy, and possessing a no-nonsense geometric charm, these plastic (or wood) workhorses are the unsung heroes of the DIY world. They’re not just for moving day or college dorm storage; they are the ultimate blank canvas for savvy apartment hackers.
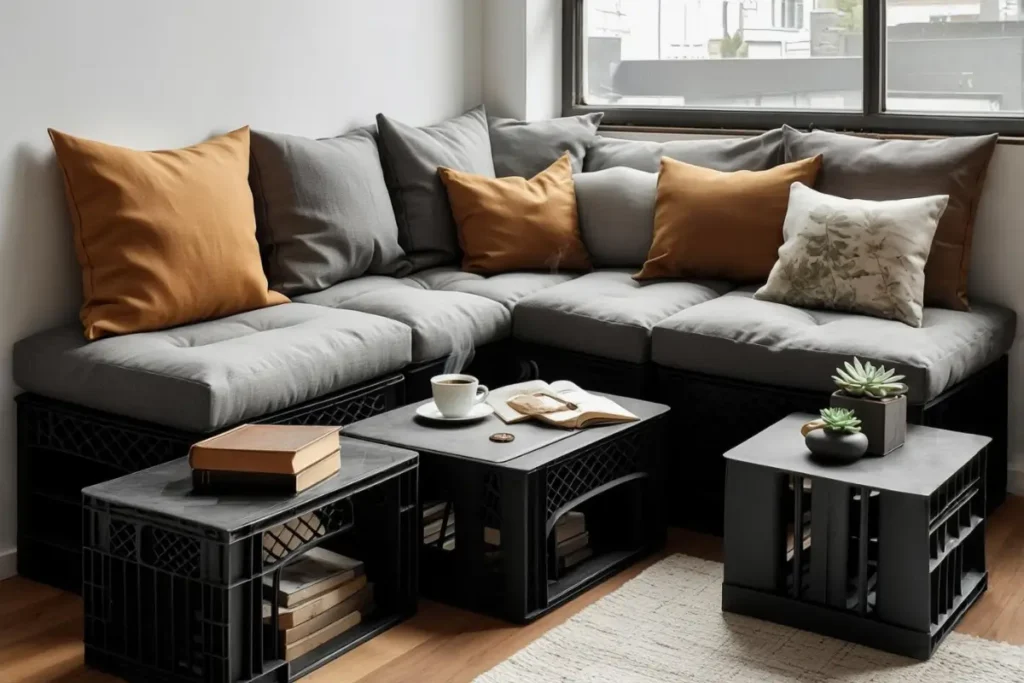
Which brings us to our delightful little pun: consider this your very own “Crate & Barrel” hack. Forget the sky-high price tags of the famous home store. We’re going to the actual crate, and creating our own barrel of fun—a custom seating solution that looks like a million bucks but spends like loose change.
This guide will walk you through the surprisingly simple process of transforming a stack of basic milk crates into a stylish, modular seating solution that you can customize to your space, reconfigure on a whim, and most importantly, proudly call your own. Let’s build something amazing.
")
Vision & Planning – Your Modular Blueprint
Before we grab a single zip tie or staple, let’s dream a little. This is where your unique creation starts. The beauty of this project isn’t just in the building—it’s in the planning. You’re designing furniture that literally adapts to your life.
The Modular Advantage: Why This Hack is a Small-Space Superpower Forget bulky, permanent sofas. Modular furniture is the secret weapon of the micro-living enthusiast. Your milk crate creation will be:
- Flexible: Need a sofa for movie night? Configure an L-shape. Having a few friends over? Break it into individual lounge seats. Want a cozy reading nook? A simple single row against the wall.
- Reconfigurable: When you get bored or move (hello, renters!), you’re not stuck. Rearrange the pieces to suit a new room layout or a new need.
- Rental-Friendly: No heavy lifting, no damage to walls or floors, and completely reversible. It’s the perfect solution for a space you can’t permanently alter.
- Multi-Functional: Each cube isn’t just for sitting—it’s potential hidden storage for blankets, books, or games.
Designing Your Layout: Grab a Pencil & Play Don’t overthink it. The best way to start is to sketch your space and play with shapes.
- Basic Configurations:
- The Single Row: A classic bench-style seat, perfect under a window or along a wall.
- The L-Shape: The ultimate space-saver for a corner, creating a perfect sofa substitute.
- The U-Shape: For a more immersive, sectional-style lounge (if you have the floor space).
- The Grid: A block of 2×2 or 3×2 cubes for a solid, substantial ottoman or low platform bed base.
- Pro Tip: Use paper cutouts scaled to your crate size (a standard crate is roughly 13″x13″) and move them around on a drawing of your room. It’s the easiest way to visualize the perfect fit.
Choosing Your Crates: Sourcing Your Foundation The “bones” of your project matter. Here’s what to look for:
- Sourcing: Check hardware stores (like Home Depot or Lowe’s), farm supply stores, online marketplaces (Facebook Marketplace is a goldmine for cheap or vintage finds), and even grocery or restaurant surplus.
- Material & Durability:
- Plastic Crates: Lightweight, easy to clean, and very affordable. Opt for heavy-duty versions if possible. Bright colors can be fun, but neutral black, grey, or tan offer a more subtle base.
- Wooden Crates: Offer a rustic, warm aesthetic and are often sturdier. They can be sanded and stained easily but may be heavier and more expensive.
- Key Consideration: Consistency! Ensure all your crates are the same external dimensions for a seamless build. The common standard is about 13″ x 13″ x 11″ high.
Tools & Materials Checklist: Get Your Arsenal Ready Gather these items before you dive in. Having everything on hand makes the process smooth and satisfying.
For Assembly & Structure:
- Milk Crates (Quantity depends on your design!)
- Zip Ties (Heavy-Duty) or Small Bolts, Nuts, & Washers – for securing crates together.
- Plywood or MDF Sheet – for creating a solid top platform (optional but recommended for comfort).
- Measuring Tape, Pencil, & Straight Edge
- Saw (or have the hardware store cut your plywood)
- Drill & Drill Bits
- Scissors or Box Cutter
For Upholstery & Finishing:
- Foam Cushion Insert(s) or Foam Mattress Topper – cut to size for seat padding.
- Batting or Quilt Wrap – to soften edges and create a plush shape.
- Fabric of Your Choice – measure carefully! (See Part 3 for tips).
- Staple Gun & Heavy-Duty Staples
- Scissors & Fabric Marker/Chalk
- Optional: Sewing machine & thread (if making fitted covers), spray paint for crates, sandpaper, casters.
With your vision clear, your crates sourced, and your tools lined up, you’re ready to move from blueprint to build. Let’s start constructing!

The Build – Assembly & Structure
Now for the fun part—transforming that stack of crates into a solid, reliable piece of furniture. This stage is all about creating a stable foundation. A wobbly seat is a no-go, so we’ll take our time to get it right.
Step 1: The Secure Base – Locking It All Together Your first and most critical task is to turn individual crates into a single, sturdy unit. Wobble happens when crates shift independently, so we’re going to permanently marry them.
- The Zip Tie Method (Easiest & Great for Renters):
- How-To: From the inside of the crates, align the holes on the adjoining sides. Thread heavy-duty zip ties through these holes, connecting the crates tightly together. Pull them as taut as possible. Use multiple zip ties per connection point for maximum strength.
- Pro Tip: Snip the tails of the zip ties flush so they don’t poke through fabric later. This method is strong, completely reversible, and leaves no visible hardware.
- The Bolt & Washer Method (Most Permanent & Sturdy):
- How-To: Similarly, from the inside, use a drill to create clean holes through adjoining crate walls. Insert a bolt with a washer on the head side, fasten with another washer and a nut on the inside of the neighboring crate, and tighten with a wrench.
- Pro Tip: This creates an incredibly rigid structure. It’s the best choice if you never plan to disassemble the base. Use fender washers to distribute pressure and prevent the bolt head/nut from pulling through the plastic.
Step 2: Creating a Platform (Optional but Highly Recommended) A solid top transforms your project from a “crate hack” to real furniture. It provides a flat, even surface for cushioning, prevents items from falling into the crate cavities, and adds crucial lateral stability.
- Measuring & Cutting: Place your assembled crate base on top of your plywood or MDF sheet. Trace around the entire perimeter. Use a straight edge and a saw (a circular saw or jigsaw works well) to cut out your platform. For a polished look, you can have this done at the hardware store when you buy the wood.
- Attaching the Platform: Place the wooden platform on top of your secured crates. From the inside of the crates, drill pilot holes up through the top lip of the crate and into the wood above. Secure it using screws (ensure they are not long enough to go all the way through the platform). Aim for 2-4 attachment points per crate. This keeps the hardware hidden and creates a clean, finished look.
Step 3: The Foundation of Comfort – Building the Perfect Seat Comfort is key. We’ll build up a cushioned base that feels great and looks professional, not like you’re just sitting on a foam block.
- The Support Layer: Measure the interior dimensions of your crate seat (or the full platform if you used one). Purchase high-density foam upholstery foam to this size, in a thickness of 3-4 inches. This is your supportive core. Use a serrated bread knife or an electric knife to cut it precisely to size.
- The Smoothing Layer: High-density foam can have hard edges. To create a soft, rounded, upholstered look, wrap your cut foam block in a layer of polyester batting (often called quilt wrap). Pull it taut around the foam and staple it to the wooden platform (if you have one), or temporarily secure it with a few pieces of tape if you’re placing it directly in a crate. This layer eliminates sharp corners and makes the final fabric drape beautifully.
Pro-Tip Check-In: Before moving on, do the “stability test.” Push firmly on all corners of your creation. If there’s any shift or creak, reinforce your internal connections. It should feel like one solid, immovable object. Now, it’s ready for its stylish skin!

The Style – Upholstery & Customization
Here it is—the moment your functional structure becomes a beautiful piece of furniture. This is the “Barrel” in our Crate & Barrel hack, where your personal style takes center stage. The choices you make here will define the final look, from cozy boho to sleek modern.
Choosing Your Fabric: Durability Meets Personality Your fabric needs to be both stylish and tough enough for daily life. Here’s what to consider:
- Apartment-Friendly Champions: Opt for high-performance, durable fabrics that can handle wear, spills, and pets.
- Performance Fabrics: Brands like Sunbrella or Crypton offer stylish options that are stain-resistant, water-repellent, and incredibly easy to clean—perfect for rental life.
- Heavy-Duty Canvas or Duck Cloth: A classic, affordable choice that’s durable and comes in endless colors.
- Washable Slipcover Fabric: If you choose Method B (below), a mid-weight cotton-linen blend or twill designed for slipcovers is ideal.
- The Upcycled Twist: For a truly unique and budget-friendly option, raid the fabric remnant bin, or use thrifted wool blankets, quilts, or vintage curtains. These materials add instant texture, history, and character, doubling down on the upcycled ethos of the project.
Upholstery 101: Two Simple Paths to a Finished Look
Method A: The Simple Wrap & Staple (Beginner-Friendly) This method creates a casual, slightly upholstered look directly on the platform. It’s quick, requires no sewing, and has a relaxed, modern feel.
- Cut: Lay your platform (foam and batting side down) onto the wrong side of your fabric. Leave at least 4-6 inches of excess fabric on all sides.
- Wrap: Pull the fabric taut over the front edge and staple it to the underside of the platform, starting in the center of each side and working outward. Fold corners neatly like wrapping a present, pulling fabric diagonally to avoid bulk.
- Finish: Ensure all staples are secure on the underside. You can optionally cover the stapled underside with a piece of felt or inexpensive muslin for a clean finish.
Method B: Fitted Cushion Covers (Polished & Practical) This method creates a professional, tailored look and is the best choice for easy cleaning. It requires basic sewing skills.
- Measure & Cut: Measure the finished dimensions of your padded seat (width, depth, and height). For a simple box cushion cover, you’ll cut a top piece to those exact dimensions, and long side strips (the “boxing”) for the depth.
- Sew: With right sides together, sew the boxing strip to the top panel along all edges, leaving one short side open. Insert a separating zipper along this open side for easy removal, or simply leave it open and close it with discreet hook-and-loop tape.
- Finish: Turn the cover right-side out, insert your foam cushion, and close. This results in a sleek, removable cover you can whip off and toss in the wash.
Pro Customization Ideas: Take Your Hack to the Next Level
- Paint the Bones: Before assembly, give plastic crates a coat of spray paint designed for plastic (after a light sanding for adhesion). A matte black, warm white, or earthy sage can elevate the base color instantly.
- Mobility: Attach heavy-duty locking casters to the bottom of your structure. This turns your seating into a mobile island you can push anywhere—fantastic for cleaning or reconfiguring a room.
- Integrated Storage: Dedicate one or two cubes to remain open, or add fabric bins, for storing remotes, magazines, or extra throw blankets. Function meets function!
- Mix & Match Patterns: Don’t feel locked into one fabric. Use a solid color for the main cushions and a bold, washable patterned fabric for throw pillows made from the leftover material.
")
Styling & Living With Your Creation
Your modular masterpiece is built and upholstered, but the true magic happens when it becomes a living, breathing part of your home. This is where you move from builder to stylist and truly reap the benefits of your smart, adaptable furniture.
Accessorize: The Final Layer of Cozy Think of your new seating as a canvas. A few well-chosen accessories will transform it from a project into a polished part of your decor.
- Throw Pillows are Key: This is your easiest tool for adding color, pattern, and next-level comfort. Use a mix of sizes—large squares for lounging, smaller lumbar or bolster pillows for support. Mix textures like chunky knit, velvet, and linen to create depth and visual interest.
- The Essential Blanket: Drape a cozy blanket—a cable-knit throw for winter or a lightweight woven for summer—over one corner. It’s instant hygge and practical for chilly evenings.
- Anchor with a Surface: Since your seating is low, pair it with a low-profile coffee table, a large ottoman tray, or even a few sturdy stackable stools. This provides a crucial surface for drinks, books, and decor, framing the area as a dedicated lounge zone.
Multi-Functional Magic: More Than Just a Seat The hidden genius of this hack is that every single cube is a potential storage unit. Don’t let that space go to waste!
- Integrated Storage: Use the crates themselves! Stash blankets, magazines, board games, or books directly inside the cubes (especially easy if you used the wrap-and-staple upholstery method). For a tidier look, add matching fabric bins or woven baskets that slide right in.
- Instant Side Tables: Simply leave one crate (or a short stack of two) uncovered and topped with its own piece of wood or a sturdy tray. It becomes the perfect, height-coordinated side table for a lamp and your coffee mug.
- Plant Stand or Display: A single, stable crate makes a fantastic pedestal for a large statement plant or a curated display of your favorite art books and objects.
The Reconfiguration Reminder: Your Evolving Space The best feature of your DIY seating isn’t its looks or storage—it’s its fluidity. Your needs change, and now your furniture can, too. Made a new friend who’s coming over? Pull out a cube as their personal seat. Craving a change when spring arrives? Break the L-shape into two facing benches to open up the room. Having a movie marathon? Push everything together into a mega-lounge.
This isn’t a static piece of furniture you’re stuck with; it’s a dynamic tool for your living space. Let it evolve with you.
Congratulations—you haven’t just built seating; you’ve built flexibility, creativity, and the proud satisfaction of a home crafted by your own hands. Now, go enjoy your amazing new space
Look at what you’ve accomplished. You started with a stack of humble, utilitarian crates and a vision for a better small space. Through planning, building, and styling, you transformed those simple modules into custom, functional furniture that is uniquely yours. This journey was about more than just creating a place to sit; it was an exercise in empowerment. You proved that with a little ingenuity, you don’t have to buy your style—you can build it, tailor it, and upcycle it into existence, all on a budget that makes sense for real life.
Now, we want to see your unique spin! Share a photo of your creation on Instagram or Pinterest and tag it with #MyCrateHack. Let’s inspire each other with different configurations, fabric choices, and brilliant adaptations. Your solution might be the perfect blueprint for someone else’s apartment puzzle.
In the end, the true takeaway is this: great design isn’t defined by a luxury price tag. It’s born from clever solutions that fit your space, your needs, and your life perfectly. You didn’t just follow a tutorial; you hacked your way to a better home. Happy lounging