The Beauty and Story of Salvaged Wood
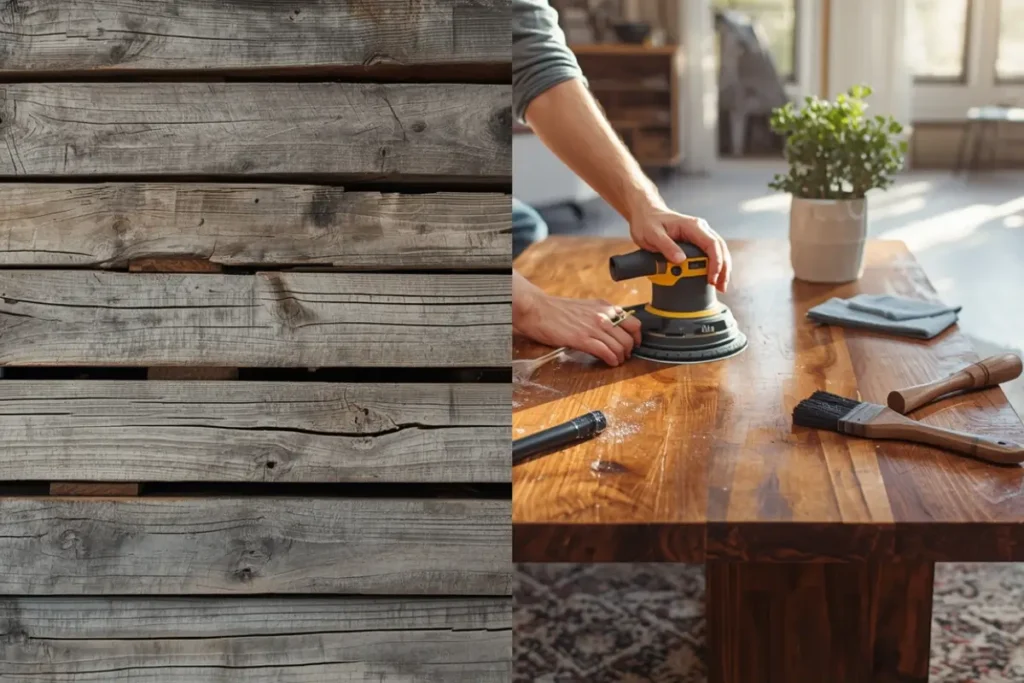
Close your eyes for a moment and picture it: the deep, weathered grooves in a barn siding board that sheltered a century of harvests. The faint, smooth scar on a factory floor plank where machinery hummed for decades. The rustic nail hole in a shipping pallet that traveled unknown distances. This isn’t just old wood—it’s a material brimming with silent stories, unique character, and a warmth that brand-new lumber simply can’t replicate.
There’s a profound magic in upcycling this material. Why choose salvaged wood? The reasons are as layered as the grain itself. First, it’s a tangible act of environmental kindness, diverting beautiful material from the landfill and reducing the demand for new resources. Second, it guarantees you a one-of-a-kind piece; no two boards share the same history, patina, or markings. Third, it’s often incredibly budget-friendly, turning what some see as scrap into a treasure. But perhaps the most compelling reason is the deep personal satisfaction that comes from the process. You’re not just building furniture; you’re becoming a curator of history, transforming forgotten pieces into a functional story you can display in your home.
That’s exactly what we’re setting out to do together. This guide is your roadmap to creating a stunning, sturdy, and conversation-starting salvaged wood coffee table. We’ll walk through every step, from sourcing your raw material with its beautiful flaws to applying the final coat of finish that makes the grain sing.
While the result looks impressive, the process is beautifully straightforward. We’ll break it down into four manageable phases: sourcing and selecting your wood, preparing it for its new life, building the table structure, and finishing it to last for generations to come. Whether you’re a seasoned DIYer or holding a drill for the first time, you have the power to breathe new life into old wood. Let’s begin.
Before You Begin: Mindset & Safety
Stepping into an upcycling project requires two essential tools long before you pick up a saw or sander: the right mindset and a commitment to safety. Let’s get these fundamentals in place.
Embrace Imperfection: The Upcycler’s Mantra
Forget the flawless, homogenous look of big-box furniture. When working with salvaged wood, you must shift your perspective. Every split, every darkened knot, every rust-stained nail hole, and every undulation from years of weathering is not a defect—it’s a feature. These “imperfections” are the very fingerprints of time and use that give your piece its soul and narrative. A crack can be stabilized and highlighted with a butterfly joint, becoming a focal point. A nail hole tells a story of the wood’s past purpose. Your goal isn’t to create something perfectly pristine, but to reveal and honor the wood’s unique character. Embrace the quirks; they are what make your table truly yours.
Safety First: Non-Negotiables for a Smart Crafter
Working with salvaged materials is incredibly rewarding, but it demands respect and caution. Your safety is paramount.
- Eye Protection: Safety glasses are non-negotiable. They shield your eyes from flying wood chips, metal fragments from old nails, and dust.
- Lung Protection: Wear a dust mask or, better yet, an N95 respirator. Sanding old wood creates fine particulate that you do not want to inhale. This is especially critical if you suspect the wood may have been painted or treated with chemicals in the past.
- Hearing Protection: Prolonged exposure to power tools like saws and sanders can damage your hearing. Simple earplugs or earmuffs make a huge difference.
- Mind the Unknown: Be cautious of old finishes. If you encounter paint on wood from before 1978, it may contain lead. If in doubt, sand minimally in a well-ventilated area with proper PPE, or consider using a paint stripper instead.
- Tool Handling: Always use sharp blades and bits. Dull tools require more force and are more likely to slip or kick back. Read tool manuals, keep guards in place, and never rush a cut.
By adopting this mindset and respecting these safety protocols, you set the stage for a project that is not only creative and fulfilling but also responsible and safe from start to finish. Now, with your head and your workspace prepared, let’s go find the perfect wood.

Phase 1: Sourcing & Selecting Your Wood
The hunt for the perfect wood is where the adventure begins—and half the fun! Knowing where to look and what to look for will set you up for success.
Where to Find Salvaged Wood
Thankfully, sources for reclaimed wood are everywhere once you start looking:
- Online Marketplaces: Facebook Marketplace, Craigslist, and Kijiji are goldmines. Search for “barn wood,” “reclaimed lumber,” “used pallets,” or “demolition wood.”
- Architectural Salvage Yards: These specialized stores (often found in larger cities) curate beautiful old materials like flooring, beams, and siding. Quality is high, but so can be the price.
- Local Demolition Sites & Renovations: Always with permission, contractors may let you take old fencing, decking, or interior lumber.
- Farms & Rural Properties: Old barns, outbuildings, and fallen fences can be great sources. Always ask the landowner first.
- Industrial Sites: Factories or warehouses undergoing renovation may discard heavy-duty floor joists or beams.
⚠️ A Crucial Note on Pallet Safety:
Pallets are a popular and accessible source, but caution is essential. Pallets are often treated for international shipping. You must identify safe ones:
- LOOK FOR THE STAMP: All treated pallets have an IPPC stamp.
- SEEK “HT”: This stands for Heat-Treated. The wood was heated to kill pests, making it safe for use. This is what you want.
- AVOID “MB”: This stands for Methyl Bromide, a toxic chemical fumigant. Do not use these pallets for indoor furniture.
- Other Safe Marks: “KD” (Kiln-Dried) is also safe.
- When in Doubt: If a pallet has no stamp, is excessively stained, or has a strong chemical odor, leave it behind.
What to Look For: Choosing Your Boards
When you’ve found a potential pile, here’s how to pick the winners:
- Structural Integrity is Key: Avoid wood that is rotting, crumbly, or infested with insects. You can work around cracks and splits, but soft, decomposed wood is no good. Give it the “fingernail test”—if you can easily dent it with your nail, it’s too far gone.
- Check for Straightness: Look down the edge of a board. Some warp or twist is manageable, but severe cupping or bowing can make assembly very difficult for a beginner.
- Consider Thickness: For a sturdy coffee table that feels substantial, aim for boards that are a nominal 1″ thick (which is actually about 3/4″ thick). This provides a good heft without being overwhelmingly heavy.
- Embrace the Aesthetic: Look for boards with the character you love—interesting grain patterns, saw marks, old paint remnants, or unique weathering. Think about how they might look side-by-side.
Estimating Quantity: A Simple Calculation
For a standard coffee table top (approximately 40″ long x 24″ wide), here’s a simple way to estimate:
- If your boards are roughly 6″ wide, you would need four boards to reach 24″ in width (4 x 6″ = 24″).
- Each board needs to be at least 40″ long.
- Therefore, you need at least four board feet (where a “board foot” is 1″ thick x 12″ wide x 12″ long) of usable wood for the top.
- Always source 20-30% extra to account for cutting off split ends, flaws, and making mistakes. For this project, grabbing 5-6 boards is a safe bet.
Pro Tip: Bring a tape measure and a pair of work gloves to your sourcing trip. It makes you look prepared and helps you make smart choices on the spot. Happy hunting
Phase 2: The Essential Tool Kit
You don’t need a professional workshop to create something amazing. This project is about clever, simple tool use. Here’s a breakdown of what you’ll need, divided into the absolute essentials and the “nice-to-haves” that can make the job easier or more refined.
The Must-Haves
These are the tools you’ll use in every stage of the project. If you’re building your toolkit, this is a perfect starter list.
- For Cleaning & Prep:
- Stiff-Bristled Brush: For scrubbing off decades of dirt, cobwebs, and loose material.
- Putty Knife or Scraper: Ideal for prying off old staples, lifting paint flakes, and general scraping.
- Sandpaper & Sanding Block: You’ll need a range of grits. Start with coarse (60-80 grit) for heavy material removal and smoothing major roughness. Move to medium (120 grit) for general smoothing, and finish with fine (180-220 grit) for a silky surface ready for finish. A sanding block makes the work faster and more even than using your hand.
- Orbital Sander (Highly Recommended): This power tool is a game-changer. It will save you hours of labor and give you a beautifully consistent surface. A budget-friendly model is perfect for this job.
- For Disassembly (if using pallets or reclaimed structures):
- Pry Bar: The go-to for gently breaking down pallets or prying apart old fencing.
- Hammer: For driving the pry bar and, of course, tapping things into place.
- Cat’s Paw or Nail Puller: This small, forged tool is essential for gripping and removing stubborn, sunken nails without damaging the wood around them.
- For Construction:
- Tape Measure & Pencil: The foundational duo for all measuring and marking.
- Combination Square: Ensures your cuts and joints are perfectly square (at 90-degree angles). A speed square is a great, affordable alternative.
- Clamps: These are your extra hands. You’ll need them to hold boards together while gluing, screwing, or sanding. At least two bar clamps or pipe clamps (24-36″) are recommended.
- Drill/Driver: A cordless drill is indispensable for driving screws and drilling pilot holes. A basic model is perfectly adequate.
- Saw: You need a way to make straight cuts.
- Circular Saw: The most versatile and affordable power saw for beginners. Use a straight-edge guide for perfect cuts.
- Miter Saw: Excellent if you have access to one, as it makes precise cross-cuts and trims ends with ease.
The Nice-to-Haves
These tools aren’t required, but they solve specific problems and can elevate the quality and ease of your build.
- Pocket Hole Jig: This clever system allows you to drill angled holes and join wood with incredibly strong, hidden joints. It’s arguably the easiest way for a beginner to build a sturdy table frame or attach the top. A basic kit is very affordable.
- Planer (Handheld or Benchtop): If your salvaged boards vary in thickness, a planer can quickly make them uniform, resulting in a seamless, professional-looking tabletop. This is a significant upgrade but not essential if you choose boards carefully.
- Wood Filler: Use this sparingly and strategically. Its purpose is only for filling structural gaps that might affect stability (like a large crack on the underside), not for covering character marks like nail holes or small checks. Remember, we embrace the story.
Pro-Tip: Before you buy anything, check with friends, family, or local tool libraries. Many communities have lending programs for power tools, which is a fantastic, cost-effective way to access what you need for a one-time project. Now, with your materials sourced and your tools at the ready, let’s get our hands dirty with the most important phase: preparation.

Phase 3: Step-by-Step Construction Guide
This is where the transformation happens. We’ll move methodically from rough, raw material to a refined piece of furniture. Remember, patience in the preparation stage pays off tenfold in the final result.
A. Step 1: The All-Important Prep (This is 80% of the Work)
Resist the urge to start building! Proper preparation is the non-glamorous but utterly critical foundation for a beautiful, long-lasting table.
1. Disassembly & Denailing:
- Work on a sturdy, flat surface. Using your pry bar, hammer, and cat’s paw, carefully take apart pallets or reclaimed structures.
- Remove every single nail, staple, and metal fragment. Not only are they a safety hazard, but they will destroy your sandpaper and saw blades. Use the cat’s paw to get under nail heads and pry them out from the back side to minimize surface damage. Check each board thoroughly—fasteners can hide.
2. Initial Cleaning:
- Take your boards outside. Use a stiff brush and a solution of mild dish soap and water to scrub off all dirt, dust, cobwebs, and loose paint flakes.
- Rinse with a hose or damp cloth and prop the boards up to dry completely, with spacers (sticks) between each one to allow airflow. This may take a day or two. Never work with or finish damp wood.
3. Milling (Making Boards Uniform):
- Option A (Minimal Tools – The Rustic Slab Look):
- This approach embraces the natural variations. Select boards that are already close in thickness. You will join them as they are, resulting in a tabletop with charming ridges and a tactile, organic feel. Focus on arranging them for the best visual composition.
- Option B (With Tools – The Refined Look):
- Trimming Edges: Use a circular saw with a straight-edge guide or a table saw to cut one long edge of each board perfectly straight (a “rip cut”). This gives you a clean line to work from.
- Evening Thickness: If you have a planer, run each board through until all are the same thickness. If not, you can use an orbital sander with coarse grit to carefully sand down high spots on the thicker boards, checking frequently with calipers or a ruler. This is labor-intensive but effective.
B. Step 2: Designing & Cutting Your Table
1. Final Design Choices:
- Decide on your final dimensions. A typical coffee table is 16-18″ tall, 36-48″ long, and 20-24″ wide.
- Choose your style: a simple rectangle, a design that incorporates a live (natural) edge, or a pattern like herringbone (advanced).
2. Building the Tabletop:
- Layout: Arrange your prepared boards on a flat surface (sawhorses or the floor). Play with the order, flipping them to find the most appealing arrangement of grain, color, and character. Mark a triangle across the boards so you can reassemble them in this perfect order.
- Cutting to Length: Once arranged, mark your desired total length. Use a combination square to draw a straight cut line across all boards. Cut them to identical length using your saw.
- Joining the Boards: Choose your method:
- Pocket Holes (Easiest for Beginners): Using a pocket hole jig, drill angled holes on the underside of your outer boards. Apply wood glue to the edges, clamp the boards together, and drive special pocket hole screws to create a strong, hidden joint.
- Battens/Crosspieces: Cut 1×3 or 1×4 boards to run perpendicular across the underside of your tabletop. Attach the tabletop boards to these battens using screws driven up through the battens. Space battens about 12″ apart. This is a simple, strong, and traditional method.
- Edge-Gluing (Advanced): Apply wood glue to the long edges of each board, clamp the entire assembly tightly with multiple clamps, and wipe away excess glue. This requires many clamps and perfect edge preparation for a seamless, glue-only joint.
3. Building the Base:
- Option Recommendation: Simple Wooden Frame (Classic & Sturdy)
- Cut four pieces of wood for the apron (the frame under the top): 2 for the length (approx. 4-6″ shorter than your tabletop length) and 2 for the width (approx. 4-6″ shorter than your tabletop width). Use 1×3 or 2×2 lumber.
- Using pocket holes (easiest) or corner blocks, assemble the apron into a rectangle. Check for square by measuring diagonally—both measurements should be equal.
- Cut four legs to your desired height (typically 15-17″ for a coffee table).
- Attach one leg to each inside corner of the apron frame using strong wood glue and screws. Ensure they are perfectly vertical.
- Finally, attach the completed tabletop to the base using figure-8 fasteners or Z-clips. These allow the wood to expand and contract with humidity without cracking.
C. Step 3: Sanding & Finishing – Revealing the Beauty
1. Sanding Strategy:
- Start with your coarsest grit (60 or 80) to remove any remaining mill marks, deep stains, or to level any slight unevenness in the tabletop. Always sand with the direction of the wood grain to avoid unsightly scratches.
- Progress to 120 grit to remove the scratches from the first stage.
- Finish with 180 or 220 grit to achieve a perfectly smooth, silky surface ready for finish. Wipe the entire piece with your hand to feel for any rough spots.
2. Final Cleaning:
- This step is critical. Any dust left will get trapped in your finish, creating a rough texture.
- Use a tack cloth (a sticky cheesecloth) or a slightly damp lint-free rag to wipe down every surface, nook, and cranny. Go over it twice to be sure.
3. The Finishing Touch – Choosing Your Finish:
- Clear Seal (For a Natural Look):
- Polyurethane: Provides a very durable, protective plastic coat. Available in satin, semi-gloss, and gloss. Use a brush and apply in a well-ventilated area.
- Tung Oil or Danish Oil: Soaks into the wood, enhancing the grain with a rich, warm, low-luster matte finish. Apply with a cloth, let soak, and wipe off excess. Multiple coats build protection.
- Clear Paste Wax: Offers a soft, beautiful sheen and light protection. Apply over another dried finish (like oil) for added depth, or directly onto raw wood for a very natural feel.
- Stain & Seal (To Alter Color):
- Choose a stain color. ALWAYS test on a scrap piece of your salvaged wood first!
- Apply stain generously with a cloth or brush, let it penetrate for 5-15 minutes, then wipe off all excess with a clean cloth. The longer it sits, the darker the result.
- Let the stain dry completely (24 hours).
- Apply 2-3 protective topcoats of polyurethane or another clear sealant as instructed above.
- Application Tips: Use a clean brush or cloth. Apply thin, even coats. Lightly sand with 320-grit sandpaper between coats of polyurethane to ensure a smooth finish, wiping away dust each time. Always follow the manufacturer’s directions on the can.
")
Phase 4: Assembly & Final Touches
The moment has arrived. With your tabletop beautifully finished and your base constructed, it’s time to unite them into a single, functional piece of furniture. This final phase is about smart connection and thoughtful details.
1. Attaching the Tabletop to the Base
This is a critical step that respects the nature of solid wood. Wood expands and contracts across its width with seasonal changes in humidity. If you rigidly screw the top directly to the base, this movement can cause cracks or warp the entire table. We use specialized hardware that secures the top while allowing it to move.
- Recommended Method: Figure-8 Fasteners These small, inexpensive metal tabs are perfect for this job. You’ll need about 8-10 for a standard table.
- Turn your tabletop upside down on a soft surface (a blanket or carpet) and position the base on top, centered.
- Mark the placement of the fasteners. Install them on the apron (frame) of the base, not the legs. Space them evenly, roughly one every 8-12 inches.
- Screw the oval hole of the fastener to the underside of the tabletop. The screw should be tight in the wood, but the metal tab should be able to rotate freely.
- Screw the round hole of the fastener to the inside of the apron. As you tighten this second screw, the fastener will pivot, creating a solid connection that still allows for micro-movement.
- Alternative Method: Pocket Holes If you used a pocket hole jig for your base, you can use it here too. Simply drill pocket holes up into the underside of the tabletop from the inside of the apron. Drive your screws. This creates a strong fix, but allows for some movement. Ensure the screws aren’t so long they poke through the top!
2. The Stability Check: Final Inspection
Place your right-side-up table on the flattest floor surface you have.
- Test for Wobble: Gently press on each corner. Does the table rock? If so, identify the offending leg.
- The Fix: Place a shim (a thin piece of cardboard or wood) under the shorter leg to level the table. Once leveled, carefully remove the table, and sand or plane a small amount off the bottom of the longer legs—not the short one. Re-check and repeat until the table sits perfectly solid, with no rocking.
3. The Professional Finish: Felt Pads
This 30-second addition makes a world of difference:
- Purpose: They protect your floors from scratches, prevent the table from sliding too easily, and dampen sound.
- Application: Purchase self-adhesive felt pads from any hardware store. Peel and stick one to the bottom center of each leg. For heavier tables, use four pads per leg in a square pattern for maximum stability and protection.
Stand back and admire your work. You have successfully rescued material, mastered new skills, and created a one-of-a-kind centerpiece filled with history and character. This table isn’t just a place for coffee cups; it’s a testament to vision, patience, and the timeless beauty of giving old things a new purpose.
Your Story, Your Table
Look at what you’ve accomplished. You began with a pile of forgotten wood, full of history but seemingly past its purpose. You saw potential where others saw scrap. Through the careful processes of sourcing, preparing, building, and finishing, you have transformed those raw stories into a beautiful, functional centerpiece for your home. This table is now a testament to both its own past and your own creativity.
Take a moment to truly celebrate this effort. You didn’t just assemble a kit; you problem-solved, you learned, and you created something that literally no one else in the world has. Consider adding a final, personal signature to your work. Write the date and your initials on the underside, or jot down the origin of the wood—“Barn wood from Maple Ridge, 2023.” This cements your chapter in its ongoing story.
We would be thrilled to see what you’ve made! Share a photo of your finished salvaged wood coffee table online and tag it with #DIYSalvagedTable to inspire others. Have a question about a step, or an idea for your next upcycling project? Drop it in the comments below—let’s keep the conversation and creativity flowing.
Ultimately, this project goes beyond DIY. It’s a hands-on lesson in preservation, sustainability, and the profound satisfaction that comes from making something with intention. You haven’t just built a table; you’ve given history a new place to live, and in doing so, created a future heirloom. Well done