
The Allure of “Grown” Furniture
Close your eyes for a moment. Imagine a quiet corner of your home, and in it, a simple stool. Now, picture that same stool just a few weeks ago, not as a collection of parts in a flat-pack box, but as sunlight dappling through its leaves, as a supple vine reaching for a garden fence, or as a flexible willow shoot dancing in the breeze. This is the magic of the project before us: the chance to sit on furniture that was, quite literally, grown.
This endeavor moves beyond simple recycling or even upcycling into the realm of regenerative design. It’s a philosophy that asks us not just to take less, but to give back; to create objects that have a positive footprint. By using materials like prolific ivy or fast-growing willow from our own gardens, we participate in a natural cycle. We manage growth, harness abundance, and transform it into something both useful and beautiful, all while forging a deeper, more tangible connection with the natural world right outside our door.
So, this isn’t merely a tutorial on how to build a stool. This is an invitation to weave a connection with nature itself. It’s a project about seeing potential in the overlooked, understanding the character of natural materials, and creating a functional piece of upcycled furniture that carries the story of your garden in its very fibers.
In the steps ahead, we’ll guide you through the entire satisfying process: from ethically foraging the right vines or rods, to preparing them for their second life, to the meditative art of weaving your unique, living-inspired seat. Let’s begin.
Why “Regenerative”? The Philosophy Behind the Practice
Before we pick up a single vine or rod, it’s worth pausing to understand the deeper “why” of this project. Creating a regenerative stool isn’t just a craft—it’s a small but meaningful act of ecological philosophy, put into practice.
Beyond Upcycling: A Act of Garden Stewardship True upcycling gives discarded items new value. But here, our raw material isn’t a discarded pallet or an old door; it’s a living part of your garden’s ecosystem. Using invasive ivy transforms a problem into a resource. By harvesting those tenacious vines that can smother trees and compete with other plants, you’re performing an act of garden management, liberating other plants to thrive. Choosing fast-growing willow is a partnership with a regenerative champion. Willow coppices beautifully, meaning cutting it back often encourages denser, healthier growth in future seasons. In both cases, you’re not just taking—you’re participating in a cycle of care and abundance, practicing a form of ecological stewardship right in your own plot of earth.
Material Mindfulness: The Quiet Alternative Now, contrast this with the hidden story of most conventional furniture. Think of the supply chains: forests harvested, materials shipped across oceans, energy-intensive manufacturing, plastic packaging, and ultimately, a product destined for landfill. Our stool exists in opposition to that narrative. This is zero-mile design. The materials travel feet, not freighters. It’s virtually zero-waste; any trimmings can return to the compost pile to nourish the soil. And at the end of its long life, this stool is fully biodegradable, destined to return to the earth without a trace of synthetic residue. It’s a quiet, tangible rejection of an extractive system, and an embrace of a closed, local loop.
The Joy of Process: Weaving with Mindfulness Finally, there is the profound joy found in the process itself. This isn’t about speed or perfection. It’s about feeling the flexible strength of a willow rod as you bend it into shape, or the surprising toughness of an ivy vine as you pull it taut. It’s a tactile, meditative practice that connects you to ancient rhythms of making. The scent of damp wood, the rustle of leaves, the focus required for each over-and-under weave—this process pulls you into the present moment. You’re not just assembling parts; you’re in a dialogue with the material, learning its language, and guiding it into a new form. The resulting stool carries not just your weight, but the memory of that focused, connected calm.
This regenerative philosophy—of stewardship, mindfulness, and connection—is the true foundation upon which your stool will be built. With that intention set, let’s turn to the practical first step: choosing your material.

Material Matters: Choosing Between Ivy and Willow
The first, and perhaps most exciting, decision in your regenerative stool journey is choosing your primary weaving material. This choice will define not only the look and feel of your finished piece but also your harvesting and preparation process. Think of it as selecting a partner for a creative collaboration with your garden.
The Ivy Option: The Garden’s Tenacious Volunteer
Ivy is the ultimate upcycler’s material—often volunteering itself with abundant, even relentless, enthusiasm.
- Pros: For many, the greatest advantage is its sheer abundance. If you have an invasive variety, harvesting becomes a productive garden chore. When cut fresh, ivy vines are incredibly flexible and strong, possessing a fibrous, rope-like toughness perfect for bearing weight. As it dries on the frame, it shrinks and hardens, creating a wonderfully gnarled, rustic texture full of organic character—no two vines are alike.
- Cons & Considerations: Ivy’s flexibility is its glory when fresh, but it becomes brittle and tricky to work with if allowed to dry out before weaving. It also requires thorough cleaning to remove leaves, tendrils, and any debris. Most importantly: always wear gloves. The sap from some ivy species (like English ivy) can cause skin irritation for many people.
- Best For: The crafters who love a wild, organic, and textured look. It’s ideal for those who want to tackle a garden problem and transform it into a feature, embracing a more free-form, rustic aesthetic.
The Willow Option: The Traditionalist’s Flexible Friend
Willow is the time-honored choice of basket weavers for good reason—it’s a material that begs to be woven.
- Pros: As a traditional basket-weaving material, willow comes with centuries of technique and knowledge behind it. It is highly predictable and forgiving to work with. The rods can be soaked to achieve perfect, uniform pliability, making the weaving process smooth and meditative. It results in a tighter, smoother finish with a classic, elegant appeal.
- Cons & Considerations: Unless you have a willow tree or shrub on your property, you may need to cultivate or source it specifically. Look for local basket-making suppliers, farmers’ markets, or consider planting a few cuttings for a future renewable harvest.
- Best For: Those seeking a more refined, classic woven appearance. It’s perfect for beginners who want a cooperative material and for anyone drawn to the serene, rhythmic practice of traditional weaving.
A Quick Tip: Look around your garden first. Let local abundance guide your initial choice. There’s a special satisfaction in using what you already have.
The Foundational Frame: The Upcycled Bones
Your living weave needs a sturdy skeleton. This is where classic upcycling shines, giving new purpose to forgotten items. Consider:
- The Salvaged Stool: An old wooden stool with a worn-out or missing seat is the perfect candidate. You’re just providing it with a stunning new regenerative top.
- The Natural Fork: A sturdy, Y-shaped forked branch (from a storm fall or necessary pruning) can become beautiful, organic legs.
- The Repurposed Crate: A small wooden crate or box, turned upside down, offers a solid base and potential for storage underneath.
- The Lashed Tripod: Three thick, straight branches (like hazel or oak), securely lashed together at the top with rope or even more ivy, create a simple, Scandinavian-inspired frame.
Choose a frame that speaks to you and matches the strength of your chosen weave. With your material selected and your frame ready, you’re prepared for the next, most grounding step: the harvest.
")
The Harvest: Ethical and Practical Foraging
Harvesting your materials is the first tangible step in bringing your stool to life. It’s a practice that blends intention with action, transforming you from a gardener or crafter into a mindful forager. Approaching this stage with respect ensures the health of your plants and the quality of your materials.
When to Harvest: Working with Nature’s Rhythms
Timing your harvest is less about calendar dates and more about understanding the life cycle of your chosen plant.
- For Willow: The ideal time is during its dormant season, from late autumn through to late winter, before the buds begin to swell in spring. During dormancy, the sap has retreated to the roots, and the rods are at their most flexible and easiest to peel (if desired). Cutting now also stimulates vigorous new growth come spring—a perfect example of regenerative practice.
- For Ivy: Ivy can be harvested from late spring through summer, when the sap is actively flowing and the vines are at their most supple and strong. Avoid the brittle, dormant periods of deep winter. Harvesting during its growth phase can also help manage its spread more effectively.
Aim for a dry day, if possible, to avoid working with waterlogged materials.
How to Harvest Sustainably: A Cut of Care
Your cutting technique is an expression of stewardship, whether you’re managing an invasive or cultivating a crop.
- Harvesting Willow (Coppicing or Pollarding):
- Use clean, sharp pruning shears or loppers.
- Cut rods cleanly at a 45-degree angle, about an inch or two above a bud or a joint. This promotes proper healing and new growth.
- For a sustainable supply, practice coppicing—cutting rods close to the ground from a established stool (base). The plant will respond by sending up multiple new, straight shoots for future harvests.
- Harvesting Ivy (Responsible Management):
- Identify the main vines you wish to remove, prioritizing those causing damage or growing where they are not wanted.
- Cut sections that are long, straight, and relatively free of heavy branching. Follow the vine back to its main stem or to the ground.
- Crucial: Ensure you are not stripping a tree trunk aggressively, as this can damage the bark. The goal is management, not defoliation. Always leave plenty of growth for wildlife that depends on ivy for shelter.
Initial Preparation: From Plant to Potential
What you do in the first few minutes after cutting sets the stage for a successful weaving experience.
- Length Selection: As you harvest, begin mentally sorting your materials. For the stool’s warp (the primary structural runners), select the longest, straightest, and strongest pieces. For the weft (the weaving strands), you can use slightly shorter or more flexible pieces. Aim for lengths that generously span the width or depth of your stool frame, plus several extra inches for tucking and securing.
- Immediate Bundling: Group your willow rods or ivy vines by approximate length and tie them loosely into bundles. This prevents a tangled mess and makes transportation easier.
- The Golden Rule: Keep Them Damp. The single most important task post-harvest is to prevent your materials from drying out. If you’re not weaving immediately, mist your bundles with water and wrap the ends in a damp cloth, or store the entire bundle in a cool, shaded place. For willow, you can submerge the butt ends in a bucket of water. For ivy, a damp burlap sack works perfectly.
This mindful harvest is the foundational act of care that your entire project is built upon. With your materials gathered and tended to, you’re ready for the transformative process of preparation.
")
Preparation: From Branch to Weaving Reed
This is the stage of transformation, where your harvested garden cuttings are refined into the pliable, workable elements of your craft. Proper preparation is non-negotiable—it’s what separates a frustrating tangle of sticks from a joyful weaving experience. Here’s how to turn branches and vines into your weaving reeds.
Cleaning: Stripping Down to the Core
This step is about removing everything that isn’t your weaving material. The process differs significantly between ivy and willow.
- For Ivy (The Essential Scrub): Cleaning ivy is a must-do, hands-on task. Wearing your gloves, start at the thick end of a vine. Firmly grip the base of a leaf stem or tendril and pull sharply downward toward the cut end; it should strip away cleanly. You can also run the vine through a loosely closed fist protected by a glove. Expect a small stream of green confetti. Remove all leaves, side shoots, and the hairy aerial rootlets. Your goal is a smooth, bare vine. A quick wipe with a damp cloth afterward removes any lingering dirt or sap.
- For Willow (The Simple Refinement): Preparation for willow is often more straightforward. If you’ve harvested in dormancy and desire the pale, smooth look of “buff” willow, you can slip off the bark after soaking (it will slide off easily). Otherwise, simply use your pruners to snip off any small side branches or buds protruding from the main rod, creating a clean, central stem.
Soaking: The Magic of Rehydration
Soaking is the alchemy that makes rigid, brittle stems supple and cooperative. Patience here is your greatest tool.
- For Willow: Submerge your bundled rods completely in lukewarm water. A bathtub, large trough, or long PVC pipe sealed at one end works perfectly. Soak for 24-48 hours for one-year-old growth, and up to 5-7 days for thicker, older rods. They are ready when they can be bent into a full “U” shape without snapping. You can soak just the ends you’ll be working with if you need some sections to remain stiff for a frame.
- For Ivy: Your window for working with ivy is shorter. Soak your cleaned vines for 4 to 12 hours in a bucket or tub. The goal is not to waterlog them, but to ensure they are fully hydrated and supremely flexible. Test by bending one; it should feel like tough, leathery rope, not a dry twig. Crucial: Keep unused vines wrapped in a very damp towel while you work to prevent them from drying out.
Gathering Your Tools: The Simple Kit
You don’t need a workshop full of equipment. Gather these essentials:
- Sharp Pruners/ Secateurs: For clean cuts on your materials and trimming ends.
- Awl or Small Drill: To create pilot holes in your wooden frame for threading and securing the warp ends, preventing splits.
- A Few Small Clamps or Spring Clamps: Invaluable for temporarily holding your first warp vines or rods in place on the frame as you start.
- Sturdy Gloves: Especially for handling ivy, but also to protect your hands from friction during tight weaving.
- Sandpaper (Medium Grit): For smoothing any rough spots on your upcycled frame before you begin.
- A Spray Bottle with Water: Your best friend for misting willow or ivy that starts to dry out mid-project.
With your materials cleaned, soaked, and your tools at hand, your prepared elements are ready to meet their foundation. The moment of creation—the weave itself—is next.
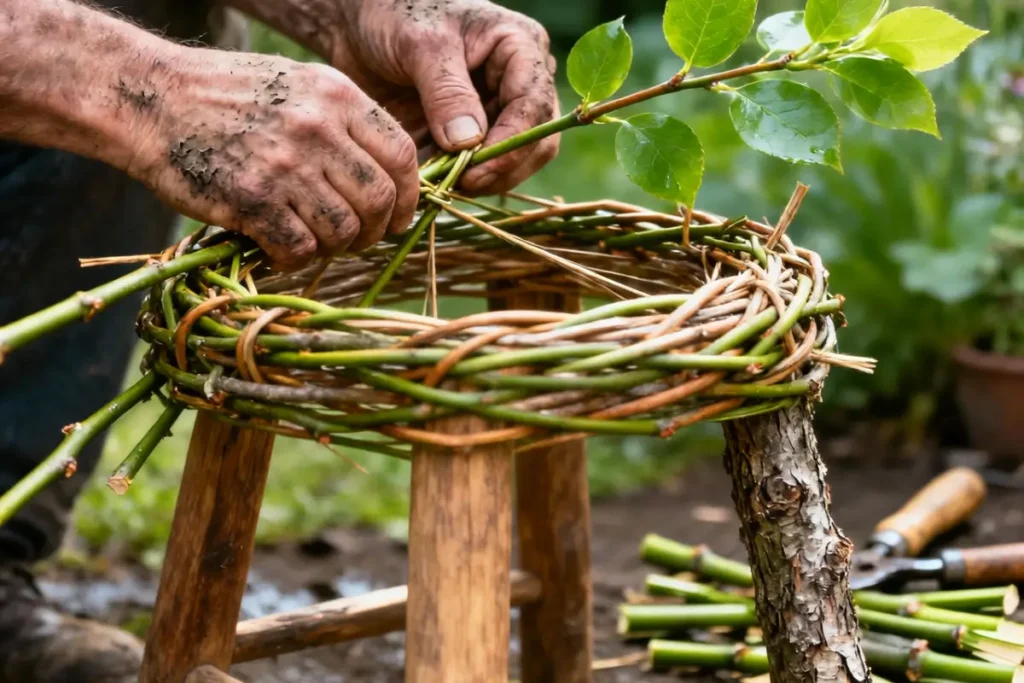
The Weaving Process: Building Your Seat, Step-by-Step
This is where the magic happens—where separate vines and rods become one cohesive, functional form. Follow these steps patiently, and you’ll witness the birth of your unique stool. (Note: Clear, step-by-step photos are invaluable here. Consider taking pictures as you go to document your own process!)
Step 1: Prepare Your Frame
Begin with a solid foundation. Sand any rough or splintered areas on your upcycled frame to create a smooth surface for attaching your weave. Wipe it clean of dust. Now, plan your pattern. Decide which direction your primary structural elements (the warp) will run—typically front-to-back for a rectangular stool, or radiating out from a central point for a circular frame. Lightly mark where each warp element will attach. If using a wooden frame, this is the time to pre-drill small pilot holes at these marks to prevent the wood from splitting when you insert your vines.
Step 2: Establish the Warp
The warp forms the backbone of your seat. Select your longest, strongest, and straightest pieces. If using a front-to-back pattern, place your first warp piece across the center of the seat area. Using your pre-drilled holes as a guide, secure each end firmly to the frame. You can do this by:
- Screwing: Use a small screw and washer over the vine/rod.
- Wrapping & Tying: Lash the end securely with durable garden twine or raffia.
- Wedging: Tucking the end into a pre-cut notch or slot in the frame. Attach the remaining warp pieces parallel to the first, spacing them evenly (about 1-2 inches apart). Consistency in spacing is key for a uniform weave. Use clamps to hold them in place as you work.
Step 3: Begin the Weft (The Weaving)
Now, take a flexible, well-soaked piece for your weft (the weaving strand). Start at one side, leaving a 3-4 inch “tail” at the back. Weave it over and under the warp strands, across the entire seat. When you reach the other side, pull it through gently until snug, loop it around the side frame member, and bring it back across, reversing the pattern (if you went over first, now go under). This simple “randing” technique creates a basic, sturdy weave.
Pro-Tip: For a thicker, faster weave, try “pairing.” Use two weft vines together as one, weaving them simultaneously. As you come back on the return pass, they will naturally twist around each other, locking the warp in place beautifully and creating a denser pattern.
Step 4: Tighten and Adjust
As you weave, use a blunt tool like a chisel, a large fork, or a dedicated weaving “packer” to gently beat down each row toward the previous one. This eliminates gaps and builds a tight, even surface. Maintain consistent, firm tension on your weft material as you go, but don’t pull so hard that you distort the warp. The goal is a firm, drum-like surface. Periodically mist your materials if they begin to dry and stiffen.
Step 5: Secure the Ends
When you’ve filled the seat area or your weft piece runs out, it’s time to finish neatly. On the final pass, tuck the remaining end of your weft vine under the previous 3-4 rows of weaving on the underside of the seat. Use your awl to open a space if needed. For warp ends, ensure they are still securely fastened to the frame. Trim all loose ends with your pruners, leaving them tidy and flush. Any small, protruding bits can be carefully tucked in.
The structure is complete. Now, as it dries, the true character of your regenerative stool will emerge.
")
Finishing Touches: Drying and Care
Your woven seat is complete, but your stool’s journey to its final form is just beginning. The steps you take now—or choose not to take—will determine its character, durability, and how it gracefully adapts to time and use.
The Drying Process: Patience is a Virtue
Resist the urge to immediately place your stool in its new spot of honor. First, it must dry thoroughly and naturally. As the moisture evaporates from the willow or ivy, the fibers will contract. This is a good thing—your weave will shrink slightly and tighten dramatically, becoming firmer and more solid under tension.
Place the stool in a well-ventilated, shaded area indoors, like a garage, shed, or spare room. Avoid direct sunlight, radiators, or heat sources, as forced, rapid drying can cause cracks or create uneven tension. This process cannot be rushed. Allow at least one to two full weeks for complete drying. You’ll know it’s ready when the material feels firm and sounds a light “tap” instead of a damp “thud.”
Sealing (Optional): To Finish or Not to Finish?
This is a personal choice that depends on your stool’s intended life. Leaving it unfinished honors its fully natural, biodegradable essence, allowing it to silver with age like garden wood.
However, if you desire added durability for regular indoor use or a richer color, a natural sealant is an option:
- Raw or Boiled Linseed Oil: Penetrates deeply, enhances the natural grain and color, and provides water resistance. Apply with a cloth, let soak, and wipe off excess. Allow to cure fully (several days) in a well-ventilated space.
- Beeswax Polish: Offers a softer, satin sheen and a lovely subtle scent. It provides less moisture protection but is easy to reapply. Melt into the wood and weave with a soft cloth.
- A Note for Outdoor Use: For occasional protected outdoor use (like on a porch), several coats of a natural, UV-resistant outdoor oil (like a Danish oil blend) can help. Understand that constant exposure to sun and rain will significantly shorten the lifespan of any natural fiber seat.
Long-Term Care: Embracing the Life of the Object
Your regenerative stool is a living piece in its own way, and its care is simple and intuitive.
- Sturdiness: It will hold significant weight when dry, but it is not a trampoline! Avoid standing on it or placing extreme point loads.
- Moisture: Protect it from prolonged dampness. If it gets wet, simply wipe it dry and let it air out thoroughly.
- Maintenance: Over many years, a weave may loosen slightly. You can gently mist the underside with water to allow the fibers to relax, then re-tighten by carefully pushing the rows back together with your hands as it dries.
- Embracing Age: Expect small shifts, gentle creaks, and a graceful softening of color. These are not flaws, but a patina of use and story. The stool will develop the character of a well-loved object, a testament to the natural materials from which it came.
Your stool is now ready—not just as a place to sit, but as a story to share.
Take a Seat on Your Story
And there you have it—a journey that began with a walk through the garden ends with a unique seat born from your own hands and land. From the mindful harvest of abundant vines or rods, through the patient preparation and meditative weaving, to the final air-drying cure, you’ve done more than assemble furniture. You’ve practiced a form of regenerative DIY, transforming living, growing materials into a functional heirloom.
Let this project be a key that unlocks a new way of seeing. Look at the greenery around you—the hedgerow, the garden edge, the trellis—not just as landscape, but as a library of sustainable materials. Every supple branch, every resilient vine holds potential for your next creative, earth-kind project.
We would be thrilled to see the story your stool tells. Share a picture of your creation with the hashtag #RegenerativeStool to connect with a community of like-minded makers. And as you sit back on your handwoven seat, let your imagination wander: a willow basket for harvests? An ivy-woven trellis? What will you weave next?
Thank you for weaving this story with us. Now, take a well-earned seat—you’ve grown a piece of furniture.