
Trash is Gross, But You’re Lazy. We Get It.
Let’s paint a familiar picture. You peel a few carrots, bin the ends. Your apple core joins the pile. By evening, that small plastic liner in your kitchen bin is looking… ominous. It’s damp, it’s a little smelly, and you’re pretty sure you just saw a fruit fly. You tie it up, make the trek to the garbage chute or building dumpster, and feel a tiny pang of guilt. All those food scraps, just heading off to a landfill. You know there’s a better way, but the very idea seems to belong to people with sprawling backyards and a lot more free time.
Sound like you? Your inner monologue probably kicks in with a list of perfectly reasonable excuses: “I live in an apartment—where would I even put a compost bin?” “It sounds way too complicated, like a science project I’d fail.” “Won’t it stink up my entire studio?” And the champion of them all: “I just don’t have the time for that.”
We hear you. Loud and clear. This isn’t a guide for the hardcore homesteader with a three-bay compost system. This is for you, the time-poor, space-limited urbanite who wants to do a little better for the planet without adding a major chore to your life.
Consider this your ultimate solution. This guide will walk you through the absolute easiest ways to start small-space composting, requiring just minutes a week. We’re talking low-effort, no-judgment methods that fit seamlessly into a busy city life. Ready to make your trash less gross and your conscience a little clearer? Let’s get into it.
The “Why Bother?” for the Lazy & Rational
Okay, so you’re not exactly itching for a new hobby. We respect that. So why should you, a rational person who values their time and personal space, even consider this? Let’s skip the lofty environmental lectures and get straight to the tangible, lazy-person benefits.
1. Less Stinky Trash. This is the number one quality-of-life upgrade. Food scraps are the primary source of what makes kitchen trash disgusting. They’re wet, they rot, and they attract flies. By pulling them out of your main waste stream, you instantly de-funk your garbage. This means fewer trips to the garbage chute and a kitchen that simply smells better. It’s a direct win for your nostrils with very little effort.
2. Feel-Good Vibes (Without the Hard Work). Let’s be real: it feels good to do a good thing, especially when it’s easy. Every apple core you compost is one less item releasing methane—a potent greenhouse gas—in a landfill. You can achieve instant eco-hero status from the comfort of your own kitchen, without signing petitions or changing your entire lifestyle. It’s a small, consistent win for the planet that adds up.
3. Potential for Free “Plant Food.” Even if you’ve managed to kill a succulent, the end result of composting is pure gardening gold. This nutrient-rich material, often called “black gold,” is something gardeners covet. You can:
- Sprinkle it on your one resilient houseplant to see it thrive.
- Gift it to your plant-parent friend and become their favorite person.
- Donate it to a community garden and be a local hero.
So, if you like the idea of a less smelly apartment, a quick dopamine hit for doing good, and creating a valuable resource from what was once just trash, you’re in the right place. Now, let’s look at the how.
Of course! Here is the text for the “Part 2: The Lazy Composter’s Toolbox” section, focusing on Method 1 as requested.

The Lazy Composter’s Toolbox: 3 Methods for Tiny Spaces
Alright, let’s get to the good stuff. You’re sold on the “why,” now here’s the “how.” We’ve vetted the most popular small-space methods and broken them down with a strict laziness-first filter. No complex diagrams or biology degrees required.
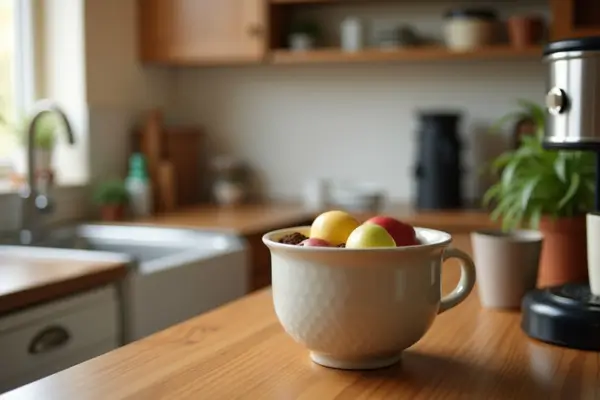
Method 1: The Countertop Bin (The “Set It and Mostly Forget It” Approach)
This is the perfect “composting with training wheels” and the easiest way to dip your toe in the water.
- What it is: Simply a small, often surprisingly stylish, container that lives on your kitchen counter or under your sink. The magic lies in its built-in charcoal filter in the lid, which actively traps odors so your kitchen doesn’t smell like a salad that’s past its prime.
- Best for: The ultimate minimalist who isn’t ready to fully process scraps at home but wants to collect them neatly. Think of it as a dedicated, odor-neutralizing interim step.
- The Lazy Lowdown:
- Pro: Zero setup. You buy it, you put it down, you start using it. That’s it. It requires no maintenance other than emptying it.
- Con: This is a collection system, not a composting system. You still have to empty the bin every few days (or once a week if you’re a light user).
- What to do with scraps: This is the key! When it’s full, you simply empty its contents into:
- A larger outdoor compost bin at a community garden or a friend’s house.
- Your city’s green bin or a designated community compost drop-off point (check your local municipality!).
- A larger compost system you might upgrade to later.
The Verdict: If your goal is simply to get smelly scraps out of your main trash with the least amount of effort, this is your champion. It’s a passive, simple habit-changer.
Method 2: The Electric Composter (The “Tech Savior” for the Truly Lazy)
If the idea of food waste sitting around for any amount of time makes you uneasy, and you have a little room in your budget for convenience, meet your new kitchen gadget.
- What it is: Imagine a sleek, compact countertop appliance—think a large coffee maker—with a simple mission: to make your food scraps disappear overnight. Brands like Lomi or Vitamix FoodCycler use a combination of low heat, grinding, and aeration to dehydrate and pulverize your scraps into a dry, dirt-like material in just a few hours.
- Best for: The urbanite who values speed, cleanliness, and a “set it and forget it” approach above all else. This is for those who see the value in throwing technology (and a bit of money) at a problem to solve it effortlessly.
- The Lazy Lowdown:
- Pro: Incredibly fast and odor-free. You load it, press a button, and wake up to “compost.” There’s no waiting, no mess, and crucially, no learning curve or worry about what you can and can’t add.
- Con: It uses electricity (a minor but notable point) and has a significant upfront cost—these gadgets are an investment.
- Output: A key distinction: the result is a dry, sanitized soil amendment, not true, microbially-rich compost. It’s fantastic for enriching soil, but it needs to be mixed into a garden bed or potting soil to be effective.
The Verdict: This is the ultimate “I want the results without the process” solution. If you can afford the ticket price, it delivers instant gratification and a completely foolproof, odorless experience.
Method 3: The Worm Farm (The “Pet” You Can Ignore)
For those who are intrigued by the full composting cycle and don’t mind a few quiet, wriggly roommates, this is the most efficient and rewarding method for a small space.
- What it is: A multi-tiered bin system (usually stackable trays) that is home to a colony of hard-working Red Wiggler worms. You feed your scraps in the top, and the worms eat, digest, and produce a super-potent, nutrient-dense fertilizer known as vermicompost or “worm castings”—the holy grail for plant lovers.
- Best for: The curious composter with a balcony, patio, or well-ventilated utility room. It’s perfect if you’re not squeamish and love the idea of a self-contained ecosystem.
- The Lazy Lowdown:
- Pro: The worms do 95% of the work. Once set up, it’s a remarkably hands-off process. You feed them once a week or so, and they quietly convert your waste into black gold. It’s incredibly efficient and feels a bit like magic.
- Con: It requires a small initial setup (buying the bin and the worms) and a basic understanding of their diet (e.g., go easy on citrus and onions).
- Myth Busting: Let’s be clear: a properly maintained worm bin does not smell. It should have a pleasant, earthy odor. And despite every fear, the worms are homebodies; they have no desire to escape their dark, cozy, food-filled paradise.
The Verdict: If you want to create the highest-quality compost right in your own home with minimal ongoing effort, the worm farm is your winner. Think of it less as a chore and more as hosting a low-maintenance, productive pet that pays you in premium plant food.

The Lazy Person’s Step-by-Step Start Guide
Feeling inspired? Good. Let’s turn that inspiration into action with a plan so simple you can’t possibly procrastinate. Follow these three steps, and you’ll be composting by this weekend.
1. Pick Your Poison. This isn’t a lifetime commitment; it’s an experiment. Look back at the three methods and choose the one that best fits your laziness profile.
- Feeling Skeptical? Start with the Countertop Bin. It’s cheap, easy, and requires no long-term commitment.
- Value Convenience Above All? The Electric Composter is your hassle-free ticket to instant gratification.
- Intrigued by the Eco-System? The Worm Farm is your best bet for creating the highest-quality compost at home.
2. Gear Up. Once you’ve chosen your method, it’s time to grab your gear. This isn’t a major shopping expedition.
- For everyone: Find a small container for your countertop—an old bowl, a used Tupperware, or a dedicated scrap bin—to collect scraps throughout the day. This saves you from walking to the main bin every time you peel a carrot.
- Then, simply order or buy the system you chose in Step 1. That’s it for setup.
3. Know Your Greens & Browns (The Only Rule You Need). Forget complex chemistry. The secret to odor-free, successful composting boils down to balancing two types of materials:
- Greens (Nitrogen): This is your food waste. Think fruit and veggie peels, coffee grounds, and crushed eggshells. They provide moisture and nitrogen.
- Browns (Carbon): This is the “lazy” secret to no smells! Browns are the dry, carbon-rich materials that absorb moisture and prevent a stinky mess. This includes cardboard egg cartons, torn-up paper bags, dried leaves, or shredded junk mail.
The Lazy Ratio: You don’t need a scale. Just remember this: for every handful of Greens (food scraps) you add, try to add a handful of Browns (paper/cardboard). If you remember to do this most of the time, you’re already a composting pro.
That’s genuinely it. You’re ready to go.
**Part 4: The Lazy Composter’s “Don’t Do It” List
You’ve got the green light on what to do. Now, let’s talk about the red lights. The goal here is to keep things simple and stress-free, so this list is short, sweet, and designed to prevent 99% of common problems.
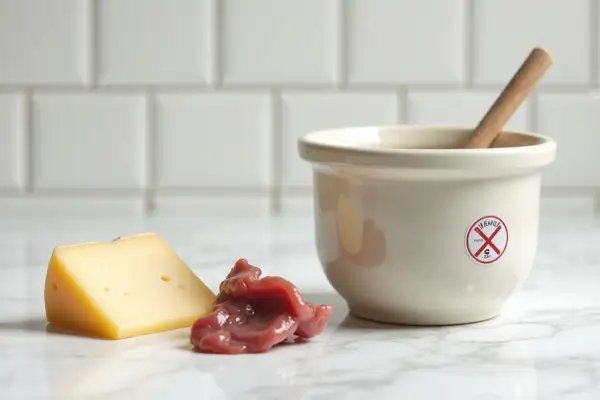
1. No-No Scraps: The Forbidden Four. Some things are just not worth the trouble in a small-space system. To avoid smells and uninvited pests, just keep these out of your bin:
- Meat & Fish (including scraps and bones)
- Dairy Products (cheese, milk, yogurt)
- Oily or Greasy Foods (cooked food with lots of oil, dressing)
- Highly Processed Foods
These items break down slowly, smell awful, and are a magnet for pests. Your easiest path? Just toss them in the regular trash guilt-free. We’re aiming for progress, not perfection.
2. Don’t Overthink It. Composting has been a natural process for millennia. You are simply guiding it, not performing a lab experiment.
- You don’t need to check the pH.
- You don’t need to turn it every day (or maybe at all, depending on your method).
- You don’t need to worry about it every single day.
The “lazy” rhythm is the right rhythm. A weekly check-in to add scraps and maybe a handful of browns is more than enough.
3. Don’t Stress About Pests. The fear of fruit flies or bugs is a big one for urban composters. Here’s the simple, two-part secret to keeping them away:
- Always cover your food scraps with “Browns.” A layer of shredded paper or cardboard on top acts as a physical barrier and soaks up excess moisture, making your bin uninteresting to flies.
- Stick to the “No-No” list above. By not adding the pungent, attractive items, you remove the main reason pests would ever bother showing up.
Follow these two rules, and your compost will be a quiet, odor-free, and pest-free part of your kitchen.
**Part 5: What To Do With Your Finished Compost? (When You Finally Have Some)
So, you’ve been diligently (or lazily) composting, and now you have a batch of that dark, crumbly “black gold.” Congratulations! If you’re staring at it thinking, “Okay, now what?”—don’t worry. You don’t need a farm to put it to good use. Here are the easiest ways to offload your valuable waste.
1. Feed Your Houseplants. Your indoor greenery will thank you for the nutrient boost. Simply sprinkle a thin layer (about a half-inch) of compost on top of the soil in your pots and gently mix it in. A little goes a long way! It’s like a superfood smoothie for your fiddle-leaf fig or snake plant.
2. Top-Dress a Potted Herb Garden. If you have a few pots of basil, mint, or rosemary on your windowsill or balcony, this is the perfect use. Top-dressing simply means adding a layer of compost on top of the soil around the base of your plants. As you water, the nutrients will slowly seep down to the roots, leading to a more vibrant and flavorful harvest.
3. Gift It. Believe it or not, you are now in possession of a gardener’s most coveted resource. Bag it up in a used paper bag or an old container and offer it to:
- Your friend with the incredible balcony garden.
- A family member who grows tomatoes.
- A coworker with a green thumb. It’s a free, thoughtful, and incredibly appreciated gift.
4. Find a Community Garden Drop-Off. If you truly have no use for it yourself, don’t let it go to waste! Many community gardens have a public compost bin where residents can contribute their scraps and drop off finished compost. A quick online search for “community garden near me” or checking your local farmers’ market (they often have collection bins) will point you in the right direction. You’re simply completing the cycle.
You’ve Got This.
Let’s be real: you started this guide because you thought composting was too much work. But look at what you now know. You don’t need a backyard, a ton of time, or a degree in ecology. You just need a simple system that fits your lazy lifestyle and a willingness to toss your apple core in a different bin.
The hardest part is always just starting. But after the first week, separating your scraps becomes as automatic as recycling a soda can. It transforms from a “chore” into an easy, odor-free habit that makes your kitchen less stinky and your conscience a little clearer.
So, what are you waiting for?
- Ready to start? Tell us in the comments below: Which lazy composting method are you going to try? The countertop bin, the electric composter, or the worm farm?
And if you found this guide helpful, do a fellow urbanite a solid:
- Share this with a friend who also hates taking out the trash. Let’s build a less wasteful, lazy-but-smart community together