Introduction: Stop Throwing Out Your Scraps!
Do you cringe a little every time you scrape those vegetable peels, coffee grounds, and apple cores into the trash? You want to live more sustainably, but when you’re renting an apartment with no backyard, the dream of composting can feel out of reach. Where would you even put a compost bin? And wouldn’t it… smell?
We get it. But here’s the secret: living in an apartment doesn’t mean you can’t be an eco-warrior.
Say hello to the 5-gallon bucket compost system—the perfect, space-saving, and completely landlord-friendly solution. This isn’t a complicated science project; it’s a simple, DIY method that transforms your kitchen waste into “black gold” for your plants, right from your balcony, patio, or even a spare closet.
Why is this the ultimate method for renters? Let us count the ways:
- Cheap & Accessible: All you need is a single, easy-to-find 5-gallon bucket and a few basic supplies.
- Compact & Portable: Its small footprint means it fits perfectly in tight spaces, and you can move it easily if needed.
- Odor-Free (When Done Right): Forget what you’ve heard! A properly maintained bucket compost system smells like fresh, earthy soil—not a stinky trash can.
- No Permanent Alterations: This is a self-contained system. When it’s time to move, you simply take your compost bin with you, leaving no trace behind.
Ready to turn your food scraps into a gardener’s treasure? Let’s dive in.
Why a 5-Gallon Bucket is a Renter’s Best Friend
You might picture composting as a large, three-bin system in a sprawling backyard or a bulky tumbler that takes up half a patio. For those of us without that kind of space, those traditional methods are simply not an option. That’s exactly where the humble 5-gallon bucket shines. It’s not just a container; it’s a perfectly tailored composting solution for the renter’s lifestyle.
The Space-Saving Hero
Let’s be real: urban living often means making the most of every square foot. A traditional compost bin is out of the question when your “yard” is a 3×3 balcony or a windowsill. The 5-gallon bucket, however, is a compact powerhouse. It has a footprint smaller than a single chair, fitting effortlessly into a corner of your balcony, tucked beside your recycling bins, or even stored in a utility closet. It’s the ultimate composting solution for a small-space reality.
Total Cost Control
As a renter, your budget is precious, and investing hundreds of dollars in a commercial compost tumbler isn’t feasible. The beauty of the bucket system is its stunning affordability. A food-grade 5-gallon bucket can often be sourced for free from local restaurants or bakeries (just ask nicely!), or purchased for a few dollars at a hardware store. Even if you have to buy everything new—bucket, lid, and drill bit—your total investment is typically under $20. This makes starting your sustainability journey a virtually risk-free experiment.
The “No-Fuss” Factor
Composting can sound intimidating, like it requires a PhD in soil science. But the bucket system keeps it gloriously simple. Its small size makes management a breeze. Turning the pile to add oxygen—a chore in a large bin—takes just 30 seconds with a small trowel. Monitoring your compost is as easy as popping off the lid and taking a quick look (and sniff). There are no complex parts, no difficult assembly, and no heavy lifting. It’s a straightforward, low-commitment system that effortlessly fits into your weekly routine, proving that eco-friendly habits don’t have to be hard work.

Gathering Your Supplies (The 10-Minute Shopping Trip)
The best part about this project? You probably already have most of what you need lying around the house, and the rest can be gathered in one quick trip to a hardware store or even sourced for free. Let’s break down your simple shopping list.
The Star of the Show:
- One 5-Gallon Bucket with a Lid: This is the heart of your operation. Look for a food-grade bucket (often marked with a #2 HDPE or #5 PP recycling symbol), as it’s designed to be safe for storing food. Pro-tip: Call a local bakery, restaurant, or even a grocery store with a bakery section. They often receive ingredients in these buckets and are usually happy to give them away for free—just make sure to wash it thoroughly! A brand-new bucket from a hardware store is also a perfectly affordable option.
The Supporting Cast:
- A Drill with a 1/4″ or 1/2″ Drill Bit: This is for creating the essential aeration and drainage holes. No drill? No problem! A hammer and a large nail will work just fine; you’ll just punch holes manually instead.
- Optional but Highly Recommended: A Second Bucket: Having an identical second bucket makes harvesting your finished compost incredibly easy. You can use it to sift and separate the finished compost from the unfinished scraps, making the final step a breeze.
- “Browns” for Carbon: This is the “brown”, dry, carbon-rich material. Start collecting:
- Shredded newspaper (non-glossy) or junk mail
- Torn-up cardboard egg cartons or toilet paper tubes
- Dry, fallen leaves from outside
- A handful of sawdust (if you have access to it)
- “Greens” for Nitrogen: This will be your ongoing contribution—your kitchen scraps! Think:
- Fruit and vegetable peels and cores
- Coffee grounds and paper filters
- Tea bags (just remove the staple)
- Crushed eggshells
- A Small Trowel or Garden Scoop: This is your primary tool for mixing and turning the compost inside the bucket. A large, sturdy spoon from your kitchen drawer can also work in a pinch.
Gather these items, and you’ll be ready to build your mini compost system in the next step
The DIY Build: Your Bucket Bin in 4 Easy Steps
Now for the fun part—transforming that simple bucket into a powerful composting machine! This process is quick, satisfying, and requires no special skills. Grab your supplies, and let’s get building.
(Editor’s Note: This section is perfect for a photo or video tutorial!)
Step 1: Create Aeration Holes
Oxygen is the magic ingredient that turns trash into treasure without the bad smells. We need to let our compost breathe.
- The Lid: Take your drill (or hammer and nail) and make 10-15 holes in the lid of the bucket. This allows fresh air to enter from the top.
- The Bottom: Flip the bucket over and drill another 10-15 holes in the bottom. This is crucial for drainage, allowing any excess moisture (leachate) to escape so your compost doesn’t become a soupy, anaerobic mess.
- The Sides: Finally, drill a few holes scattered around the upper third of the bucket’s sides for extra cross-ventilation.
Step 2: The “Base Layer” Brown Blanket
With your bucket prepped, it’s time for its first bedding. Add a generous 3 to 4-inch layer of your “browns” (shredded newspaper, dry leaves, cardboard) to the very bottom.
- Why? This layer acts like a sponge at the bottom of your bin. It will absorb any excess liquid from your food scraps from day one, preventing sogginess and neutralizing odors before they even start.
Step 3: The First Feeding
Now, let’s give your compost its first meal! Take your kitchen “greens”—a handful of fruit peels, coffee grounds, or vegetable scraps—and add them on top of the brown layer.
- The Golden Rule of Composting: Immediately cover this layer of “greens” with another handful of “browns.” Think of it as tucking your food scraps into a dry, cozy bed. This simple step is the ultimate secret to an odor-free bin, as it prevents flies and contains smells.
Step 4: Secure the Lid and Place Your Bin
Your DIY compost system is complete! Snap the lid on securely. Now, choose its new home.
- Ideal Spot: Place it outdoors on a balcony, patio, or fire escape.
- Indoor Option: If you must keep it inside, choose a well-ventilated area like a utility closet, basement, or under the kitchen sink. You may want to place a small tray or saucer underneath to catch any minimal drainage.
And that’s it! You’ve just built your own compact composting system. All that’s left to do is maintain your new mini-ecosystem, which we’ll cover next.

What to Feed Your Bucket (And What to Avoid)
Think of your compost bucket as a living ecosystem with a simple diet. Feeding it the right ingredients is the key to fast, odor-free decomposition and a healthy batch of “black gold.” Here’s your quick-reference guide to what’s on the menu and what’s strictly off-limits.
The “YES” List: Compost Buffet
“Greens” (Nitrogen-Rich)
These are your moist kitchen scraps that provide the protein for the decomposing microorganisms.
- Fruit & Vegetable Scraps: Cores, peels, rinds, and any spoiled produce.
- Coffee Grounds & Paper Filters: A compost powerhouse, adding nitrogen and a gritty texture.
- Tea Bags: Make sure to remove any staples first.
- Crushed Eggshells: Add valuable calcium, though they break down very slowly.
“Browns” (Carbon-Rich)
These are the dry, carbon-rich materials that provide energy and create air pockets, preventing a smelly, matted mess.
- Shredded Newspaper & Junk Mail: Use only non-glossy, black-and-white print.
- Cardboard: Torn-up egg cartons, cardboard boxes (avoid wax-coated).
- Dry Leaves: An excellent, natural brown material if you have access.
- Paper Towel & Toilet Paper Rolls: Torn or cut into small pieces.
The “NO” List: Keep These Out!
Absolutely Avoid:
These items can attract pests, create foul odors, and potentially harbor harmful bacteria. When in doubt, leave it out!
- Meat, Bones, & Fish Scraps: Decompose slowly and smell terrible, attracting rodents and flies.
- Dairy Products (cheese, yogurt, milk): Also create strong odors and attract pests.
- Oily or Greasy Foods: Coat materials, preventing aeration and slowing down the process.
- Cooked Foods with Sauces: Often contain oils, fats, and salts that are disruptive.
- Pet Waste: Can contain parasites and pathogens harmful to humans.
Use Sparingly:
- Citrus Peels & Onions: These are very acidic and can harm the beneficial microbes if added in large quantities, slowing down decomposition. A small amount now and then is fine.
")
Maintaining Your Mini Ecosystem
Your bucket is set up and you know what to feed it—now, let’s talk about keeping it happy and healthy. A little bit of simple, routine care is all it takes to keep the decomposition process humming along smoothly. Think of it as caring for a low-maintenance pet that turns your trash into treasure.
The “Chop and Drop” Rule
Before you even add your kitchen scraps, remember this golden tip: the smaller the pieces, the faster they break down. Give your vegetable peels a rough chop and tear up your cardboard into small bits. By increasing the surface area, you give the microbes more room to work, dramatically speeding up the composting process.
Turning the Pile
Every 3 to 7 days, it’s time for a quick workout. Take your small trowel or scoop and give the contents of the bucket a thorough stir, mixing the top layers with the bottom. This simple action is the most important thing you can do for odor control.
- Why? Turning adds precious oxygen into the mix, which fuels the aerobic bacteria that break down waste efficiently and without bad smells. If you skip this, your pile can become anaerobic (lacking oxygen), which is what causes a rotten odor.
The Sniff Test
Your nose is your most powerful composting tool. When you open the lid to add scraps or turn the pile, take a quick sniff.
- It should smell earthy, like a forest floor after rain. This means everything is working perfectly.
- If it smells sour or rotten: This is a sign of too many “greens” and not enough air. The fix is simple: Add a generous handful or two of “browns” (shredded paper, dry leaves) and turn the pile thoroughly to incorporate more oxygen.
- If it seems overly dry and not breaking down: The pile might need more moisture. Add a splash of water or include more moist “green” scraps to kickstart the process again.
With these three simple habits—chopping, turning, and sniffing—you’ll become a composting pro in no time.
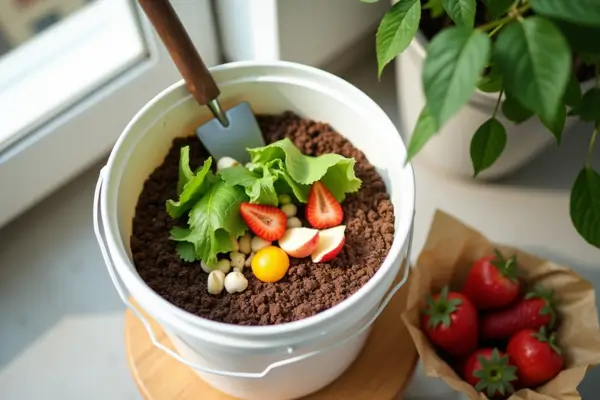
Harvesting the “Black Gold”
After a few months of feeding and caring for your bucket, you’ll be rewarded with the gardener’s ultimate treasure: rich, nutrient-packed compost. This “black gold” is the final product of all your efforts and is incredibly powerful for enriching soil. Here’s how to know when it’s ready and how to harvest it easily.
How to Know It’s Ready
You can’t rush nature, but in typically 2 to 4 months, your compost should be finished. It’s ready when the original scraps are no longer recognizable. The material will be:
- Dark brown or black in color.
- Crumbly and has a soft, soil-like texture.
- Earthy-smelling, with no sour or rotten odors.
Don’t worry if you see a few small bits of eggshell or twig—that’s normal!
The Easy Harvest Method (The Two-Bucket Sift)
This is where that optional second bucket comes in handy, making the harvesting process clean and simple.
- Dump and Sift: Take your bucket of finished compost and empty its contents into your second, empty bucket.
- Separate the Finished from the Unfinished: Put on a pair of gardening gloves and sift through the material by hand. Pick out any large, obvious pieces that haven’t fully broken down (like avocado pits, large chunks of eggshell, or a stubborn piece of citrus peel).
- Return the Unfinished: Toss these undecomposed pieces back into your active compost bucket. They will act as “starter” material for your next batch!
- Collect Your Prize: The fine, dark material left at the bottom of your second bucket is your finished, nutrient-rich compost. It’s now ready to use!
This simple method allows you to harvest the good stuff while ensuring nothing goes to waste. Now, let’s talk about what to do with this garden superfood!
")
Troubleshooting Common Issues
Even the most well-tended compost bucket can hit a small snag. Don’t panic! These small ecosystems are very resilient, and most common problems have a quick and easy fix. Here’s a handy guide to diagnosing and solving the most frequent issues.
Problem: It Smells Bad
- The Symptom: A sour, rotten, or putrid smell when you open the lid.
- The Cause & Solution: This is almost always a sign of an anaerobic (oxygen-starved) environment with too much nitrogen. Your pile is too wet and has too many “greens.”
- The Fix: Immediately add a generous amount of “browns” (shredded paper, cardboard, dry leaves) and mix everything thoroughly. The browns will soak up excess moisture and create air pockets. Then, make sure to turn the pile more frequently to reintroduce oxygen.
Problem: There Are Fruit Flies
- The Symptom: Tiny flies hovering around or inside the bucket.
- The Cause & Solution: Fruit flies are attracted to exposed food scraps.
- The Fix: This is a two-part solution. First, when you add new “green” scraps, always bury them deeply in the center of the pile and cover them completely with a layer of “browns.” This acts as a physical barrier. Second, ensure your lid is always snapped on tightly to prevent them from getting in or out.
Problem: Nothing Is Breaking Down
- The Symptom: After several weeks, your food scraps are just sitting there, looking the same as when you put them in.
- The Cause & Solution: The decomposition process has stalled, usually due to a lack of moisture or nitrogen.
- The Fix:
- If the pile is dry: Add a small splash of water and mix it in. The consistency should be like a wrung-out sponge—moist but not dripping wet.
- If the pile is dry and carbon-heavy: It might need a “green” boost. Add a handful of fresh fruit or vegetable scraps, coffee grounds, or grass clippings to reintroduce nitrogen and restart the microbial activity.
Conclusion: Your Mini Contribution to a Greener Planet
Look at what you’ve accomplished! You’ve just created a closed-loop system for your kitchen waste, right in your rental. No backyard? No problem. You’ve proven that with a little ingenuity, anyone can be a part of the solution.
Let’s recap the win-win: you’re actively reducing the amount of waste sent to the landfill, cutting down on harmful methane gases, and in return, you’re creating a free, nutrient-rich fertilizer that will make your houseplants or container garden thrive. You’ve turned a line item in your budget (food waste) into a valuable resource.
The hardest part is over—you have the knowledge. Now, it’s time to take that first simple step.
Your call to action is simple:
- Grab a bucket this weekend and get started! There’s no better time to turn your eco-friendly intentions into action.
- We’re curious! What’s the first thing you’ll compost? A week’s worth of coffee grounds? Your banana peels? Let us know in the comments below!
- Spread the knowledge. Know another renter who dreams of a greener lifestyle? Pay it forward—share this post with them!
Thank you for taking this small but powerful step for our planet. Happy composting